Engineering
Deconstructing a working Raft implementation - 1
By Gyubong LeeIn this article, we'll assume that the reader has a theoretical background in Raft, and we'll dig into the tikv/raft-rs code to see how state machines in distributed systems actually synchronize and behave in a few brief scenarios.
While this article focuses on analyzing the RAFT-RS code, we will use the RAFTIFY source code as an example in some sections for a complete understanding, as the RAFT-RS implementation does not include network and storage layers for flexibility.
💡 raftify is a high-level Raft implementation developed by Lablup. In this post, I'm only going to describe raftify with minimal code to understand how raft works. If you're curious about raftify, check out this post.
Img from: https://github.com/tikv/raft-rs
RAFT-RS architecture with a focus on ## types
Before we dive into the scenarios, let's take a quick look at the architecture, focusing on the typical types used in the code base.
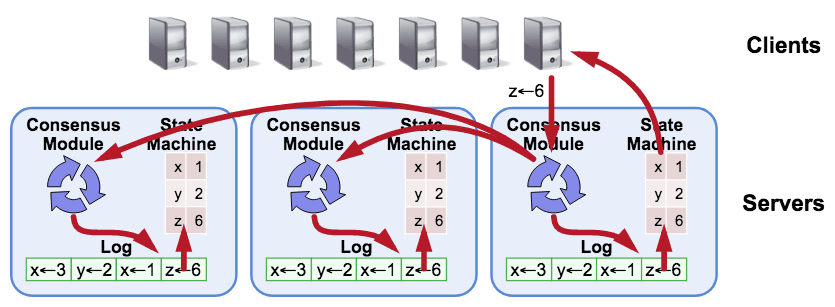
Raft
The
Raftobject of each Raft node holds a message queuemsgsin memory and interacts with other Raft nodes through this queue.In a high-level implementation like raftify, the network layer is responsible for putting messages into this queue through an abstraction layer that will be described later.
This message queue can therefore be seen as an endpoint for communication, and the
Raftimplementation will process these messages according to its current state, maintaining a consistent state between nodes.The
RaftCoretype holds the data corresponding to the state of this Raft node.There is also a type called
Progressthat holds metadata for synchronizing log entries with other Raft nodes, and these are updated appropriately in theProgressTrackerdepending on the situation.As a result, Raft has the following types
// tikv/raft-rs/blob/master/src/raft.rs
pub struct Raft<T: Storage> {
    pub msgs: Vec<Message>,
    pub r: RaftCore<T>,
    prs: ProgressTracker,
}
RaftLog
Representative of the data that
RaftCorehas isRaftLog, which abstracts access to a sequence of log entries.RaftLog<T: Storage>abstracts the typesUnstableandTso that they can be handled together. Here,Tcorresponds to persistent storage that needs to be implemented at a higher level, such as raftify, andUnstableis a buffer that goes through before being written to this storage.// tikv/raft-rs/blob/master/src/raft_log.rs pub struct RaftLog<T: Storage> { pub store: T, pub unstable: Unstable, ... }💡 If you're interested in learning more about the RaftCore type, check out this link.
Raft Loop
Raft implementations perform an iterative process of updating their state machine in an infinite loop in order to communicate with other Raft nodes and maintain a consistent state. In this article, we'll call this loop a Raft loop.
The source code for implementing a Raft loop in raftify is shown below.
(You can also see the example code in tikv/raft-rs if you want to see the most minimal implementation).
// lablup/raftify/blob/main/raftify/src/raft_node/mod.rs
async fn on_ready(&mut self) -> Result<()> {
    if !self.raw_node.has_ready() {
        return Ok(());
    }
    let mut ready = self.raw_node.ready();

    if !ready.messages().is_empty() {
        self.send_messages(ready.take_messages()).await;
    }

    if *ready.snapshot() != Snapshot::default() {
        slog::info!(
            self.logger,
            "Restoring state machine and snapshot metadata..."
        );
        let snapshot = ready.snapshot();
        if !snapshot.get_data().is_empty() {
            self.fsm.restore(snapshot.get_data().to_vec()).await?;
        }
        let store = self.raw_node.mut_store();
        store.apply_snapshot(snapshot.clone())?;
    }

    self.handle_committed_entries(ready.take_committed_entries())
        .await?;

    if !ready.entries().is_empty() {
        let entries = &ready.entries()[..];
        let store = self.raw_node.mut_store();
        store.append(entries)?;
    }

    if let Some(hs) = ready.hs() {
        let store = self.raw_node.mut_store();
        store.set_hard_state(hs)?;
    }

    if !ready.persisted_messages().is_empty() {
        self.send_messages(ready.take_persisted_messages()).await;
    }

    let mut light_rd = self.raw_node.advance(ready);

    if let Some(commit) = light_rd.commit_index() {
        let store = self.raw_node.mut_store();
        store.set_hard_state_commit(commit)?;
    }

    if !light_rd.messages().is_empty() {
        self.send_messages(light_rd.take_messages()).await;
    }

    self.handle_committed_entries(light_rd.take_committed_entries())
        .await?;

    self.raw_node.advance_apply();

    Ok(())
}
RawNode
Each Raft node has a higher-level instance of a type called
RawNodethat contains the Raft module. ARawNodehas arecordsfield that represents the metadata ofSoftState, a state that is kept only in memory,HardState, a state that is stored in persistent storage, andReady, which is not yet stored.💡 Ready is the data structure that is passed to the Raft node when it needs to be updated.
// tikv/raft-rs/blob/master/src/raw_node.rs
pub struct RawNode<T: Storage> {
    pub raft: Raft<T>,
    prev_ss: SoftState,
    prev_hs: HardState,
    max_number: u64,
    records: VecDeque<ReadyRecord>,
    commit_since_index: u64,
}
In the first part of the Raft loop, when the
readymethod is called, the metadata fromReadyis stored inrecords, and after all the snapshots, entries, etc. that need to be stored are processed, the last part of the loop,advance, callscommit_readyand updates the offset of the bufferUnstable.RaftNode
A
RaftNodeis a type that raftify abstracts aRawNodeat a higher level, integrating it with the network and storage layers.In a separate asynchronous task, raftify receives messages sent by the gRPC client and passes them over the channel to the
RaftNode.runtask.After processing the messages, it handles state changes in a function (Raft loop) named
on_ready.// lablup/raftify/blob/main/raftify/src/raft_node/mod.rs pub async fn run(mut self) -> Result<()> { let mut tick_timer = Duration::from_secs_f32(self.config.tick_interval); let fixed_tick_timer = tick_timer; let mut now = Instant::now(); loop { ... tokio::select! { msg = timeout(fixed_tick_timer, self.server_rcv.recv()) => { if let Ok(Some(msg)) = msg { self.handle_server_request_msg(msg).await?; } } ... } let elapsed = now.elapsed(); now = Instant::now(); if elapsed > tick_timer { tick_timer = Duration::from_millis(100); self.raw_node.tick(); } else { tick_timer -= elapsed; } self.on_ready().await? } }To explain raftify's implementation in more detail, raftify iterates through the following process
- generate a request from the client (e.g. call
RaftServiceClient.proposeorRaftNode.propose) RaftServiceClient.proposeon the remote Raft node is called via gRPC.- RaftServiceClient.propose
passes theProposemessage over the channel to theRaftNode.run` coroutine. 4. RaftNode.runpolls the message queue and callsRawNode::proposewhen it receives aProposemessage.- when there are changes to the state machine that need to be applied, a
Readyinstance is created and passed to theon_readyhandler. - when entries are committed, the
on_readyhandler processes the committed entries and responds to the client.
With the theoretical stuff out of the way, let's analyze a few scenarios and see what happens.
💡 What we arbitrarily call Propose messages in this paragraph is a type of message defined for the purpose of proposing a state change to the cluster.
Scenario analysis.
1 - Add a new log entry
What happens under the hood when you request (propose) a change to the cluster to alter its state machine? In this section, we'll break down what happens when you call
RawNode.propose. Here's a look at theRawNode.proposefunction// tikv/raft-rs/blob/master/src/raw_node.rs pub fn propose(&mut self, context: Vec<u8>, data: Vec<u8>) -> Result<()> { let mut m = Message::default(); m.set_msg_type(MessageType::MsgPropose); m.from = self.raft.id; let mut e = Entry::default(); e.data = data.into(); e.context = context.into(); m.set_entries(vec![e].into()); self.raft.step(m) }From the code above, you can see that the
proposefunction callsstepto make it handle a message of typeMsgPropose.Here,
stepis the function that corresponds to the actual message handler in raft-rs. If the node callingstepis the leader,step_leaderis called, if it is a follower,step_followeris called, and if it is a candidate,step_candidateis called.The code for
stepis quite complex, but let's follow the code to see how theMsgProposetype is handled on the leader node.// tikv/raft-rs/blob/master/src/raft.rs fn step_leader(&mut self, mut m: Message) -> Result<()> { ... match m.get_msg_type() { MessageType::MsgPropose => { ... if !self.append_entry(m.mut_entries()) { ... } self.bcast_append(); return Ok(()); } ... } }Raft.append_entry
callsRaftLog.appendto add an entry. RaftLog.appendappends the entries added to the Unstable buffer byself.unstable.truncate_and_append.// tikv/raft-rs/blob/master/src/raft_log.rs pub fn append(&mut self, ents: &[Entry]) -> u64 { ... self.unstable.truncate_and_append(ents); self.last_index() }As previously described, the entries added to the buffer will be persisted in a Raft loop, and updating the state machine via an
advance-like function will automatically update the offset and clear the buffer.Let's take a look at the next call,
bcast_append.You can see that we're calling
core.send_appendwith each follower'sprogressas an argument, using theProgressTracker(prs) described in the previous section to synchronize the log entries of the leader and followers.// tikv/raft-rs/blob/master/src/raft.rs pub fn bcast_append(&mut self) { let self_id = self.id; let core = &mut self.r; let msgs = &mut self.msgs; self.prs .iter_mut() .filter(|&(id, _)| *id != self_id) .for_each(|(id, pr)| core.send_append(*id, pr, msgs)); }The
send_appendhas the following simple structure// tikv/raft-rs/blob/master/src/raft.rs fn send_append(&mut self, to: u64, pr: &mut Progress, msgs: &mut Vec<Message>) { self.maybe_send_append(to, pr, true, msgs); }The
maybe_send_appendreads the log entries in the range pr.next_idx to to viaRaftLog.entriesand passes them toprepare_send_entries.(As you can infer from the
maybe_prefix to its name, the function returns true on success and false on failure.)// tikv/raft-rs/blob/master/src/raft.rs fn maybe_send_append( &mut self, to: u64, pr: &mut Progress, allow_empty: bool, msgs: &mut Vec<Message>, ) -> bool { ... let ents = self.raft_log.entries( pr.next_idx, self.max_msg_size, GetEntriesContext(GetEntriesFor::SendAppend { to, term: self.term, aggressively: !allow_empty, }), ); ... match (term, ents) { (Ok(term), Ok(mut ents)) => { if self.batch_append && self.try_batching(to, msgs, pr, &mut ents) { return true; } self.prepare_send_entries(&mut m, pr, term, ents) } ... } ... self.send(m, msgs); true }Prepare_send_entries
creates a message object m of typeMsgAppendand puts the entries into the message. It then updatesprogress` and returns it.// tikv/raft-rs/blob/master/src/raft.rs fn prepare_send_entries( &mut self, m: &mut Message, pr: &mut Progress, term: u64, ents: Vec<Entry>, ) { m.set_msg_type(MessageType::MsgAppend); m.index = pr.next_idx - 1; m.log_term = term; m.set_entries(ents.into()); m.commit = self.raft_log.committed; if !m.entries.is_empty() { let last = m.entries.last().unwrap().index; pr.update_state(last); } }Then
self.send(m, msgs)puts this prepared message into themsgsmessage queue.// tikv/raft-rs/blob/master/src/raft.rs fn send(&mut self, mut m: Message, msgs: &mut Vec<Message>) { ... msgs.push(m); }The
MsgAppendmessage that enters the message queue will be sent to the follower node fromsend_messagesthrough the network layer. Therefore, we need to see how the follower node handles theMsgAppendmessage after receiving it.Next, let's take a look at what happens on the follower node To find out what happens when a follower node receives an
MsgAppendmessage, we can look atstep_follower.// tikv/raft-rs/blob/master/src/raft.rs fn step_follower(&mut self, mut m: Message) -> Result<()> { match m.get_msg_type() { ... MessageType::MsgAppend => { self.election_elapsed = 0; self.leader_id = m.from; self.handle_append_entries(&m); } ... } }From the code above, you can see that the follower node that received the
MsgAppendmessage is callinghandle_append_entries.This function creates a
to_send, a message of typeMsgAppendResponse, and callsRaftLog.maybe_append, as shown below.// tikv/raft-rs/blob/master/src/raft.rs pub fn handle_append_entries(&mut self, m: &Message) { ... let mut to_send = Message::default(); to_send.to = m.from; to_send.set_msg_type(MessageType::MsgAppendResponse); if let Some((_, last_idx)) = self .raft_log .maybe_append(m.index, m.log_term, m.commit, &m.entries) { ... // MsgAppend 메시지를 수신 } else { ... // MsgAppend 메시지를 거절 } ... self.r.send(to_send, &mut self.msgs); }This function calls
match_termto check if the message'slogTermand the log entry'stermvalues are the same, callsfind_conflictto check for conflicts in the log entry sequence, and callsRaft.appendif it determines there are no problems.// tikv/raft-rs/blob/master/src/raft.rs pub fn maybe_append( &mut self, idx: u64, term: u64, committed: u64, ents: &[Entry], ) -> Option<(u64, u64)> { if self.match_term(idx, term) { let conflict_idx = self.find_conflict(ents); if conflict_idx == 0 { } else if conflict_idx <= self.committed { fatal!( self.unstable.logger, "entry {} conflict with committed entry {}", conflict_idx, self.committed ) } else { let start = (conflict_idx - (idx + 1)) as usize; self.append(&ents[start..]); if self.persisted > conflict_idx - 1 { self.persisted = conflict_idx - 1; } } let last_new_index = idx + ents.len() as u64; self.commit_to(cmp::min(committed, last_new_index)); return Some((conflict_idx, last_new_index)); } None }We've seen this function before. It was the last function called before the call to
RaftLog.appendwhen a log entry was proposed by the leader node.As before,
Raft.append_entrycallsRaftLog.appendto add the entry. RaftLog.appendappends the entries added to the Unstable buffer fromself.unstable.truncate_and_append`.This outlines a scenario where logs added to the leader are persisted on the leader node and copied to the follower nodes.
2 - Leader and follower node log sequence mismatch
In scenario 1, we looked at the code assuming a normal situation, but in reality, issues such as network disconnection can cause mismatches between leader and follower nodes. Let's take another look at the code, this time focusing on how to detect and resolve mismatches between leader and follower nodes.
Let's say you have a cluster of three nodes that is processing thousands of requests that are successively changing the state machine, and then a network failure occurs.
In the event of a failure, we should start by looking at the logs written to the nodes, persisted log entries, and debugging information to get some context, but to avoid making this post too long, we'll just pick out the logs that will give us a general idea of what's happening on the nodes and analyze them.
First of all, node 3 is leaving a rejected msgApp... log indicating that it has rejected a message.
Nov 28 05:30:59.233 DEBG rejected msgApp [logterm: 7, index: 3641] from 2, logterm: Ok(0), index: 3641, from: 2, msg_index: 3641, msg_log_term: 7From the log above, we can see that node 3 is a follower node, node 2 is the newly elected leader node after the failure, and that the
MsgAppendmessage trying to replicate the 3641th entry was rejected.If we look up what function this log is output from, we can see that it is called from
handle_append_entries, which we saw in Scenario 1 (the function that handles theMsgAppendmessages that the follower receives from the leader).pub fn handle_append_entries(&mut self, m: &Message) { ... let mut to_send = Message::default(); to_send.to = m.from; to_send.set_msg_type(MessageType::MsgAppendResponse); ... if let Some((_, last_idx)) = self .raft_log .maybe_append(m.index, m.log_term, m.commit, &m.entries) { ... } else { debug!( self.logger, "rejected msgApp [logterm: {msg_log_term}, index: {msg_index}] \ from {from}", msg_log_term = m.log_term, msg_index = m.index, from = m.from; "index" => m.index, "logterm" => ?self.raft_log.term(m.index), ); let hint_index = cmp::min(m.index, self.raft_log.last_index()); let (hint_index, hint_term) = self.raft_log.find_conflict_by_term(hint_index, m.log_term); if hint_term.is_none() { fatal!( self.logger, "term({index}) must be valid", index = hint_index ) } to_send.index = m.index; to_send.reject = true; to_send.reject_hint = hint_index; to_send.log_term = hint_term.unwrap(); } to_send.set_commit(self.raft_log.committed); self.r.send(to_send, &mut self.msgs); }If you look at the function, you can see that this log was output, which means that
maybe_appendreturned None, which means thatmatch_termreturned False. This means that there is a mismatch between thelogTermin the message and the value oftermin entry 3641.So we find the point of conflict via
term(find_conflict_by_term) and put the point of conflict (hint_index) into thereject_hintof the message and send it back to the reader in the form of anMsgAppendResponsemessage.So what does the leader do with this rejected
MsgAppendResponsemessage?The leader node that rejected the message will leave a log that the
MsgAppendwas rejected, as shown below.Nov 28 05:30:59.279 DEBG received msgAppend rejection, index: 3641, from: 3, reject_hint_term: 7, reject_hint_index: 3611So the next thing we need to look at is the function that receives this rejected
MsgAppendmessage and outputs "received msgAppend rejection".This function is called
handle_append_response, and while the function itself is quite long, it's not that long when you cut it down to just what happens when anMsgAppendis rejected.fn handle_append_response(&mut self, m: &Message) { let mut next_probe_index: u64 = m.reject_hint; ... if m.reject { debug!( self.r.logger, "received msgAppend rejection"; "reject_hint_index" => m.reject_hint, "reject_hint_term" => m.log_term, "from" => m.from, "index" => m.index, ); if pr.maybe_decr_to(m.index, next_probe_index, m.request_snapshot) { debug!( self.r.logger, "decreased progress of {}", m.from; "progress" => ?pr, ); if pr.state == ProgressState::Replicate { pr.become_probe(); } self.send_append(m.from); } return; } ... }Take the
reject_hintfrom the message and make it thenext_probe_index, and callProgress.maybe_decr_toto decrement the progress. Indicate thatProgressis in the probe state, and callsend_appendto send anotherMsgAppendmessage.💡 ProgressState is an enum that represents the synchronization progress of each node. Under normal circumstances, it is "Replicate" if the node is replicating logs, "Probe" if the follower node does not know the last index that was replicated, and "Snapshot" if the node is in a probing state and is replicating logs to the follower by sending snapshots.
To summarize, to find the index (
next_probe_index) of the log entry before the collision, we decrement the node'sprogressand send anotherMsgAppendmessage. This process is repeated until we find the Common log prefix of the leader and follower nodes.Once the Common log prefix is found, log entries after that index are replicated in a unidirectional fashion from the leader to the follower and overwritten. This process can be seen in the
maybe_send_appendfunction.The log entries obtained through
RaftLog.entriesare replicated into theSendAppendcontext as shown below. Here,max_msg_sizeismax_size_per_msgfrom Config, which defaults to0. WithRaftLog.entries, themax_sizeof theLMDBStorage.entries(persistent storage type, corresponding to T inRaftLog) argument is given0, which, based on this comment, means that if you don't set it, it will synchronize log entries one by one when there is a mismatch in the logs of the leader and follower nodes.After that,
prepare_send_entriesis used to prepare theMsgAppendmessage as described in the previous section, andRaft.sendis used to replicate the entries to the follower node.// tikv/raft-rs/blob/master/src/raft.rs fn maybe_send_append( &mut self, to: u64, pr: &mut Progress, allow_empty: bool, msgs: &mut Vec<Message>, ) -> bool { ... let mut m = Message::default(); m.to = to; if pr.pending_request_snapshot != INVALID_INDEX { ... } else { let ents = self.raft_log.entries( pr.next_idx, self.max_msg_size, GetEntriesContext(GetEntriesFor::SendAppend { to, term: self.term, aggressively: !allow_empty, }), ); ... let term = self.raft_log.term(pr.next_idx - 1); match (term, ents) { (Ok(term), Ok(mut ents)) => { if self.batch_append && self.try_batching(to, msgs, pr, &mut ents) { return true; } self.prepare_send_entries(&mut m, pr, term, ents) } ... } } self.send(m, msgs); true }There are a lot of logs missing in the middle, but you can see that after the synchronization between the leader and the follower has occurred through the above process from the *3612th entry to the *3642nd entry, the follower's
progress statechanges toReplicateand it starts sending and receivingHeartbeatmessages normally.2023-11-28 14:30:59,269 - INFO - Entries [3612, 3643) requested Nov 28 05:30:59.269 DEBG Sending from 2 to 3, msg: Message { msg_type: MsgAppend, to: 3, from: 0, term: 0, log_term: 7, index: 3611, entries: [Entry { context: "1810", data: "{'key': '2292', 'value': '1'}", entry_type: EntryNormal, index: 3612, sync_log: false, term: 7 }], commit: 3642, commit_term: 0, snapshot: Snapshot { data: "None", metadata: None }, request_snapshot: 0, reject: false, reject_hint: 0, context: "None", deprecated_priority: 0, priority: 0 }, to: 3, from: 2 2023-11-28 14:30:59,259 - INFO - Entries [3613, 3643) requested Nov 28 05:30:59.269 DEBG Sending from 2 to 3, msg: Message { msg_type: MsgAppend, to: 3, from: 0, term: 0, log_term: 7, index: 3612, entries: [Entry { context: "1811", data: "{'key': '2294', 'value': '1'}", entry_type: EntryNormal, index: 3613, sync_log: false, term: 7 }], commit: 3642, commit_term: 0, snapshot: Snapshot { data: "None", metadata: None }, request_snapshot: 0, reject: false, reject_hint: 0, context: "None", deprecated_priority: 0, priority: 0 }, to: 3, from: 2 2023-11-28 14:30:59,259 - INFO - Entries [3614, 3643) requested Nov 28 05:30:59.269 DEBG Sending from 2 to 3, msg: Message { msg_type: MsgAppend, to: 3, from: 0, term: 0, log_term: 7, index: 3613, entries: [Entry { context: "1812", data: "{'key': '2295', 'value': '1'}", entry_type: EntryNormal, index: 3614, sync_log: false, term: 7 }], commit: 3642, commit_term: 0, snapshot: Snapshot { data: "None", metadata: None }, request_snapshot: 0, reject: false, reject_hint: 0, context: "None", deprecated_priority: 0, priority: 0 }, to: 3, from: 2 2023-11-28 14:30:59,259 - INFO - Entries [3615, 3643) requested Nov 28 05:30:59.269 DEBG Sending from 2 to 3, msg: Message { msg_type: MsgAppend, to: 3, from: 0, term: 0, log_term: 7, index: 3614, entries: [Entry { context: "1813", data: "{'key': '2296', 'value': '1'}", entry_type: EntryNormal, index: 3615, sync_log: false, term: 7 }], commit: 3642, commit_term: 0, snapshot: Snapshot { data: "None", metadata: None }, request_snapshot: 0, reject: false, reject_hint: 0, context: "None", deprecated_priority: 0, priority: 0 }, to: 3, from: 2 ... 2023-11-28 14:30:59,284 - INFO - Entries [3641, 3643) requested Nov 28 05:30:59.283 DEBG Sending from 2 to 3, msg: Message { msg_type: MsgAppend, to: 3, from: 0, term: 0, log_term: 7, index: 3640, entries: [Entry { context: "1839", data: "{'key': '2457', 'value': '1'}", entry_type: EntryNormal, index: 3641, sync_log: false, term: 7 }], commit: 3642, commit_term: 0, snapshot: Snapshot { data: "None", metadata: None }, request_snapshot: 0, reject: false, reject_hint: 0, context: "None", deprecated_priority: 0, priority: 0 }, to: 3, from: 2 2023-11-28 14:30:59,284 - INFO - Entries [3642, 3643) requested Nov 28 05:30:59.284 DEBG Sending from 2 to 3, msg: Message { msg_type: MsgAppend, to: 3, from: 0, term: 0, log_term: 7, index: 3641, entries: [Entry { context: "None", data: "None", entry_type: EntryNormal, index: 3642, sync_log: false, term: 12 }], commit: 3642, commit_term: 0, snapshot: Snapshot { data: "None", metadata: None }, request_snapshot: 0, reject: false, reject_hint: 0, context: "None", deprecated_priority: 0, priority: 0 }, to: 3, from: 2 Nov 28 05:31:01.635 DEBG Sending from 2 to 1, msg: Message { msg_type: MsgHeartbeat, to: 1, from: 0, term: 0, log_term: 0, index: 0, entries: [], commit: 3642, commit_term: 0, snapshot: Snapshot { data: "None", metadata: None }, request_snapshot: 0, reject: false, reject_hint: 0, context: "None", deprecated_priority: 0, priority: 0 }, to: 1, from: 2 Nov 28 05:31:01.635 DEBG Sending from 2 to 3, msg: Message { msg_type: MsgHeartbeat, to: 3, from: 0, term: 0, log_term: 0, index: 0, entries: [], commit: 3642, commit_term: 0, snapshot: Snapshot { data: "None", metadata: None }, request_snapshot: 0, reject: false, reject_hint: 0, context: "None", deprecated_priority: 0, priority: 0 }, to: 3, from: 2 2023-11-28 14:31:01,6373 - Electing a leader
In Scenario 2, we could tell from the increase in the
termvalue that the leader election was caused by a network failure, but in this scenario we'll take a closer look at the leader election process.To see what logs would be taken if the leader failed, we'll simply create a cluster of 3 nodes, force the leader process to shut down, and look at the logs of the process that is newly elected leader.
To summarize the logs, after the leader node shuts down, node 3 starts the election and transitions to the Candidate state and sends a
MsgRestVotemessage to the other voters. The process can be summarized as: you receive aMsgRequestVoteResponsemessage from node 2, you are elected as the new leader because you received a majority of the votes for yourself, you increase the term value to 2, and you send a special kind of message (an emptyMsgAppend) to announce that you are the elected leader.💡 A follower node that has not received a heartbeat message by election_tick will start voting. In this case, to avoid split vote, election_tick is determined to be a random value between min_election_tick and max_election_tick each time. Therefore, after the leader node is terminated, any of the remaining two nodes can become the leader node, and it will be elected as the node with the smaller election_tick.
Nov 29 01:30:30.210 INFO starting a new election, term: 1
Nov 29 01:30:30.210 DEBG reset election timeout 16 -> 10 at 0, election_elapsed: 0, timeout: 10, prev_timeout: 16
Nov 29 01:30:30.210 INFO became candidate at term 2, term: 2
Nov 29 01:30:30.210 DEBG Sending from 3 to 1, msg: Message { msg_type: MsgRequestVote, to: 1, from: 0, term: 2, log_term: 1, index: 3, entries: [], commit: 3, commit_term: 1, snapshot: Snapshot { data: "None", metadata: None }, request_snapshot: 0, reject: false, reject_hint: 0, context: "None", deprecated_priority: 0, priority: 0 }, to: 1, from: 3
Nov 29 01:30:30.210 DEBG Sending from 3 to 2, msg: Message { msg_type: MsgRequestVote, to: 2, from: 0, term: 2, log_term: 1, index: 3, entries: [], commit: 3, commit_term: 1, snapshot: Snapshot { data: "None", metadata: None }, request_snapshot: 0, reject: false, reject_hint: 0, context: "None", deprecated_priority: 0, priority: 0 }, to: 2, from: 3
Nov 29 01:30:30.211 INFO broadcasting vote request, to: [1, 2], log_index: 3, log_term: 1, term: 2, type: MsgRequestVote
2023-11-29 10:30:30,217 - WARNING  - Failed to connect to node 1 elapsed from first failure: 0.0000s. Err message: <AioRpcError of RPC that terminated with:
    status = StatusCode.UNAVAILABLE
    details = "failed to connect to all addresses; last error: UNKNOWN: ipv4:127.0.0.1:60061: Failed to connect to remote host: Connection refused"
    debug_error_string = "UNKNOWN:failed to connect to all addresses; last error: UNKNOWN: ipv4:127.0.0.1:60061: Failed to connect to remote host: Connection refused {created_time:"2023-11-29T10:30:30.216855+09:00", grpc_status:14}"
>
2023-11-29 10:30:30,222 - DEBUG    - Node 3 received Raft message from the node 2, Message: Message { msg_type: MsgRequestVoteResponse, to: 3, from: 2, term: 2, log_term: 0, index: 0, entries: [], commit: 0, commit_term: 0, snapshot: Snapshot { data: "None", metadata: Some(SnapshotMetadata { conf_state: Some(ConfState { voters: [], learners: [], voters_outgoing: [], learners_next: [], auto_leave: false }), index: 0, term: 0 }) }, request_snapshot: 0, reject: false, reject_hint: 0, context: "None", deprecated_priority: 0, priority: 0 }
Nov 29 01:30:30.223 INFO received votes response, term: 2, type: MsgRequestVoteResponse, approvals: 2, rejections: 0, from: 2, vote: true
Nov 29 01:30:30.223 TRCE ENTER become_leader
Nov 29 01:30:30.223 DEBG reset election timeout 10 -> 17 at 0, election_elapsed: 0, timeout: 17, prev_timeout: 10
Nov 29 01:30:30.223 TRCE Entries being appended to unstable list, ents: Entry { context: "None", data: "None", entry_type: EntryNormal, index: 4, sync_log: false, term: 2 }
Nov 29 01:30:30.223 INFO became leader at term 2, term: 2
Nov 29 01:30:30.223 TRCE EXIT become_leader
Nov 29 01:30:30.223 DEBG Sending from 3 to 1, msg: Message { msg_type: MsgAppend, to: 1, from: 0, term: 0, log_term: 1, index: 3, entries: [Entry { context: "None", data: "None", entry_type: EntryNormal, index: 4, sync_log: false, term: 2 }], commit: 3, commit_term: 0, snapshot: Snapshot { data: "None", metadata: None }, request_snapshot: 0, reject: false, reject_hint: 0, context: "None", deprecated_priority: 0, priority: 0 }, to: 1, from: 3
Nov 29 01:30:30.223 DEBG Sending from 3 to 2, msg: Message { msg_type: MsgAppend, to: 2, from: 0, term: 0, log_term: 1, index: 3, entries: [Entry { context: "None", data: "None", entry_type: EntryNormal, index: 4, sync_log: false, term: 2 }], commit: 3, commit_term: 0, snapshot: Snapshot { data: "None", metadata: None }, request_snapshot: 0, reject: false, reject_hint: 0, context: "None", deprecated_priority: 0, priority: 0 }, to: 2, from: 3
Let's take a look at the logs to see what's going on in the code.
First of all, the function that is printing the log "starting a new election" is
hup.hup
is called during the processing of messages of typeMsgHupfromstepandMsgTimeoutNowfromstep_follower`.Note that the
MsgTimeoutNowmessage is the message type used for Leader transfer, not Leader election. This means that when the leader receives theMsgTransferLeadermessage, it will send a message of typeMsgTimeoutNowto its followers and thehupfunction will be executed with thetransfer_leaderflag set to True. While Leader election is the process of electing a new leader in the event of a leader failure, Leader transfer is the process of a leader process transferring leadership to another follower process.So we can see that the message we need to follow now is
MsgHup. We can guess that it was thetick_electionfunction below that put in theMsgHupmessage because we didn't get a Heartbeat after theelection_tick, so we started electing a leader.Remember how we called
self.raw_node.tick()everytick_timeronRaftNode? ThisRawNode.tickallows the node to step anMsgHupmessage to itself if theelection_elapsedhas passed therandomized_election_timeout. (Randomizing theelection_elapsedhere is to prevent a situation where all nodes start voting at the same time and all nodes vote for themselves).// raw_node.rs pub fn tick(&mut self) -> bool { self.raft.tick() } // raft.rs pub fn tick(&mut self) -> bool { match self.state { StateRole::Follower | StateRole::PreCandidate | StateRole::Candidate => { self.tick_election() } StateRole::Leader => self.tick_heartbeat(), } } // raft.rs pub fn tick_election(&mut self) -> bool { self.election_elapsed += 1; if !self.pass_election_timeout() || !self.promotable { return false; } self.election_elapsed = 0; let m = new_message(INVALID_ID, MessageType::MsgHup, Some(self.id)); let _ = self.step(m); true } // raft.rs pub fn step(&mut self, m: Message) -> Result<()> { ... match m.get_msg_type() { ... MessageType::MsgHup => { self.hup(false) }, } } // raft.rs pub fn pass_election_timeout(&self) -> bool { self.election_elapsed >= self.randomized_election_timeout }The
hupfunction runs thecampaignfunction with theCAMPAIGN_ELECTIONtype, as shown below to summarize.// tikv/raft-rs/blob/master/src/raft.rs fn hup(&mut self, transfer_leader: bool) { ... info!( self.logger, "starting a new election"; "term" => self.term, ); ... self.campaign(CAMPAIGN_ELECTION); }The
campaignfunction transitions its own state to theCandidatestate and starts voting, as shown below.First of all,
self_idis the node's own id, as the name suggests, soself.poll(self_id, vote_msg, true)means to vote for yourself.If the result is
VoteResult::Won, then the node wins the vote as it is and returns as the leader.So you can see that messages like
MsgRequestVote,MsgRequestVoteResponse, etc. will not be sent back and forth in a single-node cluster.But of course, this scenario is not the case because it is not a single-node cluster.
// tikv/raft-rs/blob/master/src/raft.rs
pub fn campaign(&mut self, campaign_type: &'static [u8]) {
    let (vote_msg, term) = if campaign_type == CAMPAIGN_PRE_ELECTION {
        ...
    } else {
        self.become_candidate();
        (MessageType::MsgRequestVote, self.term)
    };
    let self_id = self.id;
    if VoteResult::Won == self.poll(self_id, vote_msg, true) {
        // We won the election after voting for ourselves (which must mean that
        // this is a single-node cluster).
        return;
    }
    ...
}
Before we dive into the latter part of
campaign, let's take a look at howpollworks.The
pollis a function that callsrecord_vote,tally_votes, and depending on the result of the poll, if it wins the vote, it transitions to the leader node and broadcasts (bcast_append) that it is the new leader of the cluster.If it loses the vote, it transitions to a follower node, and if the result is
Pending, it returns without doing anything.// tikv/raft-rs/blob/master/src/raft.rs fn poll(&mut self, from: u64, t: MessageType, vote: bool) -> VoteResult { self.prs.record_vote(from, vote); let (gr, rj, res) = self.prs.tally_votes(); if from != self.id { info!( self.logger, "received votes response"; "vote" => vote, "from" => from, "rejections" => rj, "approvals" => gr, "type" => ?t, "term" => self.term, ); } match res { VoteResult::Won => { if self.state == StateRole::PreCandidate { self.campaign(CAMPAIGN_ELECTION); } else { self.become_leader(); self.bcast_append(); } } VoteResult::Lost => { let term = self.term; self.become_follower(term, INVALID_ID); } VoteResult::Pending => (), } res }The role of
record_voteis quite simple. It records in the hashmap objectvotesof theProgressTrackerwhen a node with the valueidhas voted for itself.// tikv/raft-rs/blob/master/src/tracker.rs pub fn record_vote(&mut self, id: u64, vote: bool) { self.votes.entry(id).or_insert(vote); }Let's look at
tally_votes. You can see that the hashmapvotesis counting the number of nodes that voted for you and the number of nodes that rejected you, and returning them as a tuple.💡 The word "tally" refers to the act of counting or aggregating points, so "tally_votes" is a function that counts and aggregates votes.
// tikv/raft-rs/blob/master/src/tracker.rs
pub fn tally_votes(&self) -> (usize, usize, VoteResult) {
    let (mut granted, mut rejected) = (0, 0);
    for (id, vote) in &self.votes {
        if !self.conf.voters.contains(*id) {
            continue;
        }
        if *vote {
            granted += 1;
        } else {
            rejected += 1;
        }
    }
    let result = self.vote_result(&self.votes);
    (granted, rejected, result)
}
Let's take a look at how we determine the outcome of a vote.
For a joint quorum, we need to get the consensus of both quorums (Incoming quorum, Outgoing quorum) to win the vote.
So we need to look at the three
vote_resultfunctions below.In tracker.rs, we pass as an argument the callback function
check, which allows the nodeidto know if the hashmapvoteshas voted for it.In joint.rs, we return
VoteResult::Wononly if both configurations win, andVoteResult::Lostif either side loses the vote. Otherwise, we returnVoteResult::Pending.The actual counting of votes is done in
vote_resultin majority.rs.It counts the number of nodes in the cluster that voted for itself and the number of nodes that did not vote, and returns
VoteResult::Wonif more than a majority of the nodes agree,VoteResult::Pendingif the majority is greater than a majority when including nodes that did not get a majority of the votes but failed to send a response, orVoteResult::Lostotherwise.// tracker.rs pub fn vote_result(&self, votes: &HashMap<u64, bool>) -> VoteResult { self.conf.voters.vote_result(|id| votes.get(&id).cloned()) } // joint.rs pub fn vote_result(&self, check: impl Fn(u64) -> Option<bool>) -> VoteResult { let i = self.incoming.vote_result(&check); let o = self.outgoing.vote_result(check); match (i, o) { // It won if won in both. (VoteResult::Won, VoteResult::Won) => VoteResult::Won, // It lost if lost in either. (VoteResult::Lost, _) | (_, VoteResult::Lost) => VoteResult::Lost, // It remains pending if pending in both or just won in one side. _ => VoteResult::Pending, } } // majority.rs pub fn vote_result(&self, check: impl Fn(u64) -> Option<bool>) -> VoteResult { ... let (mut yes, mut missing) = (0, 0); for v in &self.voters { match check(*v) { Some(true) => yes += 1, None => missing += 1, _ => (), } } let q = crate::majority(self.voters.len()); if yes >= q { VoteResult::Won } else if yes + missing >= q { VoteResult::Pending } else { VoteResult::Lost } } // util.rs pub fn majority(total: usize) -> usize { (total / 2) + 1 }We've seen how the voting process is based on the
voteshashmap, but before this can happen, this hashmap needs to be updated appropriately via theMsgRequestVote,MsgRequestVoteResponsemessages.So, let's continue following the
campaignfunction.We can see that the
campaignfunction is creating messages of typeMsgRequestVoteand sending them to voters.So next, let's follow the handler for the
MsgRequestVotemessage.// tikv/raft-rs/blob/master/src/raft.rs pub fn campaign(&mut self, campaign_type: &'static [u8]) { let (vote_msg, term) = if campaign_type == CAMPAIGN_PRE_ELECTION { ... } else { self.become_candidate(); (MessageType::MsgRequestVote, self.term) }; let self_id = self.id; if VoteResult::Won == self.poll(self_id, vote_msg, true) { // We won the election after voting for ourselves (which must mean that // this is a single-node cluster). return; } // Only send vote request to voters. for id in self.prs.conf().voters().ids().iter() { if id == self_id { continue; } ... let mut m = new_message(id, vote_msg, None); m.term = term; m.index = self.raft_log.last_index(); m.log_term = self.raft_log.last_term(); m.commit = commit; m.commit_term = commit_term; ... self.r.send(m, &mut self.msgs); } ... }At first glance, it seems complicated, but at the end of the day, what the handler of
MsgRestVotedoes is create and send a message to agree or disagree with this vote.Based on the
vote_resp_msg_type, the type we sent isMsgRequestVote, so the type of the response message will beMsgRequestVoteResponse. (We'll skip describing the prevote algorithm in this article)So let's see when a node agrees to vote and when it disagrees. If you peruse the code along with the comments, you'll notice that three conditions must be met for a node to agree to a vote.
-
can_vote
is *true* (either you already voted for the node, or you don't know theleader_idfor thisterm` and haven't voted yet) -
self.raft_log.is_up_to_dateis true (the message'stermvalue is greater thanRaftLog.last_termor, if equal, the message's index is greater thanRaftLog.last_index) -
the index of the message is greater than
RaftLog.last_index, or has a higher priority.
If these three conditions are met, we send a message that we agree to vote, and if none of them are met, we reject the vote.
Now let's move on to the receiver of the
MsgRequestVoteResponse.// raft.rs pub fn step(&mut self, m: Message) -> Result<()> { ... match m.get_msg_type() { MessageType::MsgRequestVote => { // We can vote if this is a repeat of a vote we've already cast... let can_vote = (self.vote == m.from) || // ...we haven't voted and we don't think there's a leader yet in this term... (self.vote == INVALID_ID && self.leader_id == INVALID_ID) // ...and we believe the candidate is up to date. if can_vote && self.raft_log.is_up_to_date(m.index, m.log_term) && (m.index > self.raft_log.last_index() || self.priority <= get_priority(&m)) { self.log_vote_approve(&m); let mut to_send = new_message(m.from, vote_resp_msg_type(m.get_msg_type()), None); to_send.reject = false; to_send.term = m.term; self.r.send(to_send, &mut self.msgs); if m.get_msg_type() == MessageType::MsgRequestVote { // Only record real votes. self.election_elapsed = 0; self.vote = m.from; } } else { self.log_vote_reject(&m); let mut to_send = new_message(m.from, vote_resp_msg_type(m.get_msg_type()), None); to_send.reject = true; to_send.term = self.term; let (commit, commit_term) = self.raft_log.commit_info(); to_send.commit = commit; to_send.commit_term = commit_term; self.r.send(to_send, &mut self.msgs); self.maybe_commit_by_vote(&m); } } } } // raft.rs pub fn vote_resp_msg_type(t: MessageType) -> MessageType { match t { MessageType::MsgRequestVote => MessageType::MsgRequestVoteResponse, MessageType::MsgRequestPreVote => MessageType::MsgRequestPreVoteResponse, _ => panic!("Not a vote message: {:?}", t), } } // raft_log.rs pub fn is_up_to_date(&self, last_index: u64, term: u64) -> bool { term > self.last_term() || (term == self.last_term() && last_index >= self.last_index()) }The
MsgRequestVoteResponsemessage handler is very simple!It calls the
pollfunction we saw earlier to update thevoteshashmap and update theStateRoleif the vote has been decided.// tikv/raft-rs/blob/master/src/raft.rs fn step_candidate(&mut self, m: Message) -> Result<()> { match m.get_msg_type() { ... MessageType::MsgRequestVoteResponse => { ... self.poll(m.from, m.get_msg_type(), !m.reject); self.maybe_commit_by_vote(&m); } } }Summary
In this article, we looked at the code architecture based on the types used in RAFT-RS, and then followed and analyzed the code of a RAFT implementation in three basic scenarios. We hope that this article has helped you expand your understanding of the RAFT module. In the next installment, we'll take a deeper look at how the RAFT implementation works with more scenarios.
Thanks 😊
This post auto translated from Korean
29 March 2024
- generate a request from the client (e.g. call

2024 GTC Event Live Rankings: How to Utilize GraphQL Subscription
By Sujin KimLablup commemorated the 2024 GTC event by hosting a special event. Participants created images similar to the given image using the LLM model provided by Lablup, and among those who scored high, an NVIDIA RTX 4090 graphics card was awarded through lottery. 🫢
In this post, we aim to highlight the subscription feature of GraphQL, which was used in the leaderboard page of the event, allowing participants to monitor their scores in real time.
GTC24 event page
What is a Subscription?
It is a mechanism that allows the client to query data in response to a server side event stream. In cases where data changes in real time, for example when implementing real-time logs or chat applications, updates can be immediately reflected when pushed from the server.
Subscription sends data only when the required information changes on the server. Therefore, in the case where data changes are not frequent, Subscription can reduce data traffic, which can also lead to cost savings.
A similar concept is setting the
fetchPolicyof GraphQL's Query to network-only to always get the latest results, but it’s different from the features of subscriptions. This ensures the latest data by always requesting the server whenever the client needs data. However, network costs accompany each request. Thus, while it is okay to set fetchPolicy to network-only to guarantee the latest results whenever a button is clicked, if it is used to retrieve data where updates are frequent like a stock trading window, network costs would be significant.How to Use
Defining Subscription
The usage is similar to Query, just use the keyword
subscription.const leaderboardSubscriptions = graphql` subscription Ranking_leaderboardSubscription { leaderboard { submissions { id name score imageUrl } lastUpdatedAt } } `;When an event occurs in the
leaderboardstream, a notification is sent to the application, and the client can get the updated result.Then the following result can be obtained.
leaderboard: {
	submissions: [
		{
    	"id": "76293167-e369-4610-b7ac-4c0f6aa8f699",
	    "name": "test",
    	"score": 0.5910864472389221,
	    "imageUrl": "<IMAGE_URL>"
		},
    ],
	lastUpdatedAt: 1710176566.493705
}
subscribe
To display real-time rankings, when entering the relevant page, call subscribe, and when moving to other pages, call dispose to unsubscribe using
useEffect.import { useEffect } from 'react'; import { requestSubscription } from 'react-relay'; useEffect(() => { const subscriptionConfig = { subscription: leaderboardSubscriptions, variables: {}, onNext: (response: any) => { setLeaderboard(response.leaderboard.submissions); // 미리 정의된 state }, onError: (error: any) => { console.error('Leaderboard subscription error', error); }, }; const { dispose } = requestSubscription( RelayEnvironment, // refer 'How to Configure' below subscriptionConfig, ); return () => { dispose(); }; }, []); // Executing this part only when the component is mounted or unmounted by setting an empty dependency arrayrequestSubscription- Provides a
Disposableobject as a return value. - This
Disposableobject includes a `dispose method to cancel the subscription.
onNext- As data is updated through subscription, it updates the pre-defined state to display real-time rankings.
- In addition to
onNext,onError, there are various configurations such as onCompleted called when the subscription ends andupdaterto update the in-memory relay storage based on server response. For detailed descriptions, refer to this link.
dispose- A cleanup function is returned in the
useEffecthook and the dispose method is called to end the subscription when the component is unmounted.
How to set up (+Relay)
According to the Relay documentation, GraphQL subscriptions communicate with WebSockets, and you can set up a network using graphql-ws. (There is also a way to use subscriptions-transport-ws, but it's deprecated, so we'll pass on that).
import { ExecutionResult, Sink, createClient } from 'graphql-ws'; import { Environment, Network, RecordSource, Store, SubscribeFunction, RelayFeatureFlags, FetchFunction, Observable, GraphQLResponse, } from 'relay-runtime'; import { RelayObservable } from 'relay-runtime/lib/network/RelayObservable'; import { createClient } from 'graphql-ws'; const wsClient = createClient({ url: GRAPHQL_SUBSCRIPTION_ENDPOINT, connectionParams: () => { return { mode: 'cors', credentials: 'include', }; }, }); const subscribeFn: SubscribeFunction = (operation, variables) => { return Observable.create((sink: Sink<ExecutionResult<GraphQLResponse>>) => { if (!operation.text) { return sink.error(new Error('Operation text cannot be empty')); } return wsClient.subscribe( { operationName: operation.name, query: operation.text, variables, }, sink, ); }) as RelayObservable<GraphQLResponse>; }; // Export a singleton instance of Relay Environment // configured with our network function: export const createRelayEnvironment = () => { return new Environment({ network: Network.create(fetchFn, subscribeFn), store: new Store(new RecordSource()), }); }; export const RelayEnvironment = createRelayEnvironment();wsClient- For url, enter the websocket URL of the GraphQL server.
- credentials can be set via
connectionParams.
subscribeFn
- Defines the subscription behavior of the Observable.
- Validate the query string in
if (!operation.text) { ... }and if it is invalid, raise an error and abort the execution. - Finally, the
return wsClient.subscribe( ... )code actually subscribes to the subscription using the WebSocket client and passes the payload of the GraphQL operation to the sink (i.e., the Observer). - In short, this function is responsible for handling the GraphQL subscription request and pushing the result to the Observable stream whenever a subscription event occurs.
createRelayEnvironment- Create and return a new Relay Environment.
- A Relay environment is a container that manages other high-level Relay objects, network layer, cache, etc.
- We have assigned functions to
fetchFnto handle GraphQL query/mutation requests andsubscribeFnto handle subscription requests. - To create a Relay Store to store and manage cache data, we used the
RecordSourcestore.
RelayEnvironment- The
createRelayEnvironmentfunction is called to initialize the RelayEnvironment and export it for later import and use elsewhere. - This configured
RelayEnvironmentis mainly used byQueryRenderer,useLazyLoadQuery,commitMutation, etc.
CORS error
Initially, I read the
config.tomlfile used on the server side to set the websocket URL of the GraphQL server and set the address. However, I kept getting CORS errors and Unauthorized every time I sent a request. So I did a lot of shoveling around, and with the help of my colleague, I was able to solve it. (Thank you so much 🥹🙏)The solution is to use
http-proxy-middlewareto set upsetupProxy!As you can see in the create-react-app manual, you can set up a
setupProxyto proxy requests from your development server to a specific path on your real server, usually to prevent CORS issues in development environments where the frontend and backend are separated, or to proxy requests from your development server to a specific path on your real server.The code looks like this
const { createProxyMiddleware } = require('http-proxy-middleware');

module.exports = function (app) {
  app.use(
    createProxyMiddleware('/graphql', {
      target: 'http://127.0.0.1:9220',
      changeOrigin: true,
      followRedirects: true,
      ws: true,
    }),
  );
};
createProxyMiddleware('/graphql', { ... })- Sets the middleware to handle all HTTP requests originating from '/graphql'.
target: 'http://127.0.0.1:9220'- Set the address of the server to which proxied requests will be forwarded. Here we set it to port 9220.
changeOrigin: true- Change the host header of the request to the host of the target. Use this to work around CORS issues.
followRedirects: true- This setting causes the proxy to follow redirects when the server sends a redirect response to a request.
ws: true- This setting enables the WebSocket proxy. The websocket connection between the client and server is also passed through this proxy, which we set to
truefor subscribe.
Leaderboard page
After a lot of digging, we've finally finished the leaderboard page! 🎉 A big thank you to everyone who participated. 🙇🏻♀️

Conclusion
Using GraphQL subscriptions, we were able to implement features like real-time rankings. Although I struggled with how to set it up because of CORS, it was not difficult to use because it is not much different from writing a query.
I think the biggest advantages of subscriptions are real-time updates and efficiency. Because it receives data from the server in real time, users always see the latest status, and because it only gets updates when the data it needs changes, it can minimize server requests for data that doesn't change often.
However, it is complex as it requires an implementation of websockets or similar real-time protocols, as well as logic to manage the connection state between the client and server. Although not covered in this article, subscription requires additional work on the server side. And because it requires a real-time connection, it can consume server resources and client resources.
Therefore, which method is more cost or performance efficient depends on many factors, including the nature of your application, the frequency of data updates, and the number of concurrent users, so use your best judgment.
references
- https://relay.dev/docs/v10.1.3/subscriptions/
- https://relay.dev/docs/guided-tour/updating-data/graphql-subscriptions/#configuring-the-network-layer
- https://developer.mozilla.org/en-US/docs/Web/API/WebSockets_API
- https://github.com/enisdenjo/graphql-ws
- https://github.com/apollographql/subscriptions-transport-ws
- https://graphql.org/blog/subscriptions-in-graphql-and-relay
- https://create-react-app.dev/docs/proxying-api-requests-in-development
This post is automatically translated from Korean
28 March 2024
- Provides a

Backend.AI Meets Tool LLMs : Revolutionizing AI Interaction with Tools - Part 3
By Sergey Leksikov- Part 1. Introduction to LLMs and Tool Interaction
- Part 2. Backend.AI Gorilla LLM model serving
- Part 3. Making own API Retriever and Question Answering system with few lines of code locally without training and serving LLM
Part 3. Making own API Retriever and Question Answering system with few lines of code locally without training and serving LLM
Previously, in Part 1 we talked about Tool LLM and their usage. Part 2 demonstrated how to run Gorilla LLM on Backend.AI. In the Part 3, there will be talk about the case when there are no GPU available, but we still want to get help and assistance regarding our API.
Suppose we have Backend.AI, and we want to get information about Backend.AI REST API and Functional API in more interactive way via question answering style. The example of REST API can be described in this documentation: https://docs.backend.ai/en/latest/manager/rest-reference/index.html

Figure 1. Backend.AI REST API Documentation
In addition, Backend.AI REST API documentation can be exported into openapi.json format:

Figure 2. Backend.AI openai.json
Another source of BackendAI API is functional API defined in Backend.AI Client. We want to know how to interact with Backend.AI and which parts of code are responsible. The client code repository is responsible with managing and interacting with cloud and computing environment:
Steps to make a Question Answering API system
- Let’s setup Backend.AI Client locally from https://github.com/lablup/backend.ai/tree/main/src/ai/backend/client on our local PC environment and create a new directory
bai-dev/src/ai/backend/client/gpt_api_client
Figure 3. The directory location of gpt_api_client
- At vector_data directory let’s create two sub directories data1/ which will store a REST api documentation: openapi.json and
data2/will store selected B.AI Client files over which we want to do an API Question Answering.
Figure 4. Overview of data directories with openapi.json and client function code files
-
Let’s install python library LlamaIndex library. Pip install llama-index. Note LlamaIndex is not related to Meta LLaMA language model. LlamaIndex is about data structures and methods for efficient processing and storing documents for retrieval.
-
Let’s convert our api and code files into an embedded vector and store them in a Vector Database with LLamaIndex. Let’s use Jupyter Notebook interactive environment which is also integrated in out VSCode on a local PC.

Figure 5. Jupyter Notebook interactive environment. Loading openapi.json from data/ directory. Then asking questions from query engine over a vector index.
- Vectorize
data2/directory with our code functions
Figure 6. Load data2/ directory with code files from B.AI Client. Then vectorize them into index and create a question answering engine.
We can save both indexes using python Pickle or Joblib libraries which are commonly used for storing and serializing objects to later load them into system. joblib.dump(index, "rest_api_index.joblib") and joblib.dump(index, "functional_index.joblib")
-
Jupyter Notebook environment already provides to us ability to ask questions and get response in interactive way. Additionally, we can load the saved vectorized indexes on FastAPI server and answer questions over the web. In previous Part 2, we set computational session with Gorilla LLM. From the previous demo we still have a computational session with a FastAPI server.
-
Let’s transfer the files rest_api_index.joblib and functional_index.joblib to api_helper/ vFolder at Backend.AI Cloud session
-
At file server.py load the vector indexes and define the query engines.

Figure 7. server.py definition of index files and query engine.
- For each query engine we specify an FastAPI endpoint.

Figure 8. Code snippets for REST and Functional API retrieval
- Test server response from your local PC using curl command. When a server gets queried on a specific endpoint, it will get an answer from a user.
curl -X POST -H "Content-Type: application/json" -d '{"instruction":"Create a new session"}' http://127.0.0.1:8000/rest_api
Figure 9. Command line response from curl command. Example 1
curl -X POST -H "Content-Type: application/json" -d '{"instruction":"Create a new session"}' http://127.0.0.1:8000/functional
Figure 10. Command line response from curl command. Example 2
In addition, we can make a web app which receives user input, sends to corresponding endpoint, and receives the answer.

Figure 11. A web app prototype for Question Answering over Backend.AI REST and Functional API. Example 1

Figure 12. A web app prototype for Question Answering over Backend.AI REST and Functional API. Example 2
Conclusion
In Part 3, we demonstrated how to locally create a Question-Answering system using open-source python library LLamaIndex which helped to convert our documents and Backend.AI code into vector form. The question answering can be done in interactive way in a Jupyter Notebook environment which Visual Studio Code supports with plugins. Furthermore, we decided to move those vector indexes to a Backend.AI Cloud environment where a Gorilla LLM API tuned model is server. Then an API Question-Answering web app was implemented to assist users over network.
Reference:
- LLama Index. https://docs.llamaindex.ai/en/stable/
Demo video for Backend.AI API Helper and Gorilla LLM:
- Part 1. Introduction to LLMs and Tool Interaction
- Part 2. Backend.AI Gorilla LLM model serving
- Part 3. Making own API Retriever and Question Answering system with few lines of code locally without training and serving LLM
30 January 2024
Backend.AI Meets Tool LLMs : Revolutionizing AI Interaction with Tools - Part 2
By Sergey Leksikov- Part 1. Introduction to LLMs and Tool Interaction
- Part 2. Backend.AI Gorilla LLM model serving
- Part 3. Making own API Retriever and Question Answering system with few lines of code locally without training and serving LLM
Part 2. Backend.AI Gorilla LLM model serving
Previously, we talked about the Tool LLM capabilities and usage. In this article, there will be a step-by-step demonstration of how to run the Gorilla LLM model on the Backend.AI Cloud while using Backend.AI Desktop app.

Figure 1. A Backend.AI Desktop app installed on MacOs
- Press a start button to make a session creation menu appear.

Figure 2. New session start interactive screen
-
Select NGC-Pytorch 23.07 image
-
Attach a vFolder which is a working directory containing the model files. For example: api_helper/ directory name.

Figure 3. Attaching vFolder screen
- Select the resource amount 128 GB RAM and 5 fGPU

Figure 4. Resource selection screen
- Select a Visual Studio Code Desktop environment
 Figure 5. IDE environment selection screen
-
At
/home/work/api_helper/directory create a server.py file -
Create a requirements.txt file

Figure 6. Content of requirements.txt file
To install requirements run the command:
pip install -r requirements.txt
Figure 7. Executing install requirements command
- Create a server.py and define using transformers library the tokenizer and model loader.

Figure 8. Code snippet of server.py
- Define server IP address and port number

Figure 9. Definition of server IP address and port number
- To run the model type: python server.py

Figure 10. Starting a server.py
- Accessing the created server
VSCode automatically creates a port tunneling session from your device to a Backend.AI Cloud server. You may see the server status by accessing the localhost address and the request will be tunneled to a Backend.AI Cloud. In addition, you may define other custom endpoints according your needs.

Figure 11. The server run log

Figure 12. VSCode Port Forwarding configuration

Figure 13. Accessing the root of a server
Up to this point, we create a computation session on Backend.AI Cloud, attached an api_helper/ vFolder directory with requirements.txt file and server.py. Then we started our FastAPI server where the Gorilla LLM is gets downloaded from HuggingFace repository and loaded into computation session memory with inference/ api .endpoint
- API Inference testing To test the API inference of Gorilla LLM you may create a curl request from your local computer command line:
curl -X POST -H "Content-Type: application/json" -d '{"text":"Object detection on a photo. <<<api_domain>>>:"}' http://127.0.0.1:8000/inference
Figure 14. An example of curl request

Figure 15. The GPU workload on a server after receiving the request

Figure 16. The server logs of receiving the request and printing the result
- Defining UI web app. You may use any web technology to make a UI app which can display the result in a better way. For example, you may use html and JavaScript files and place them in static directory under root of server.py Then define an endpoint for a web app.

Figure 17. Example of adding an html web app to a FastAPI server
- Gorilla LLM Web App prototype - an API tuned Large Language Model for API question answering and code generation.

Figure 18. Gorilla LLM web app prototype. Example 1

Figure 19. Gorilla LLM web app prototype. Example 2
Conclusion
Despite some difficulties of Gorilla LLM serving, LLM tuned on own API has a large potential and promises. Since, the model can provided the most recent results with more accurate parameters and function calls than commercial large models and be useful in tasks such as question answering over API, code autocomplete, API code executions.
Limitations and difficulties:
While trying to server the Gorilla LLM model there were following issues to consider:
- Model may generate response in not expected format
- Model may generate result different for same questions
- Parsing and rendering LLM response
- Eliminating the duplicate sentences and lines
- Part 1. Introduction to LLMs and Tool Interaction
- Part 2. Backend.AI Gorilla LLM model serving
- Part 3. Making own API Retriever and Question Answering system with few lines of code locally without training and serving LLM
29 January 2024
Backend.AI Meets Tool LLMs : Revolutionizing AI Interaction with Tools - Part 1
By Sergey Leksikov- Part 1. Introduction to LLMs and Tool Interaction
- Part 2. Backend.AI Gorilla LLM model serving
- Part 3. Making own API Retriever and Question Answering system with few lines of code locally without training and serving LLM
Part 1. Introduction to LLMs and Tool Interaction
What if future AI technology capabilities were available now? Probably while you are on the way home from your workplace, you could ask an AI Assistant to turn on the air-conditioner in the home before your arrival. At same time you are planning the vacation and after having few options you ask an AI model to do hotel booking on your behalf. As the model books your trip, you receive a notification from a cloud provider about your deep learning model's training progress. You ask the AI Assistant to run another session with another set of parameters for the experiment while targeting specific values for performance accuracy. How be such a futuristic scenario realized in the present days?
This kind of interaction of LLM with real world could be possible via Application Programmatic Interfaces (API). The specific Tool Large-Language Model (LLM) fine-tuned on APIs dataset can respond user’s query with specific API and that API can invoke a program or functions to make a real-world impact. Large Language Models (LLM) are rising in popularity due to their outstanding capabilities of generating text in context while also having reasoning capability for problem solving. Text model utilization ranges from text generating, editing they as well become useful as a copilot for a programmer. How else can LLMs extend their usage beyond their text-generating capabilities?
With Tool LLM, we are stepping into an era where AI in addition to understanding our requests, the AI can act on those requests using a universe of online tools. Tool LLM are pushing the boundaries of what AI can do with tools via functional and REST APIs.
GPT-4 is currently the state-of-the-art among LLMs, topping most AI benchmarks. Consider this scenario, a GPT-4 model is being asked to transcribe the audio file into text of another language. However, when prompted to use specific APIs, GPT-4 may hallucinate and suggest non-existent APIs or provide incorrect arguments. As consequence causing function execution failure and not achieving objectives of user specified task.
Besides issues with hallucinations and inaccuracies, API documentation and versions are constantly changing. The retraining general purpose LLM is costly and not practical to keep the LLM models updated with constantly changing documentations. Tool LLMs provides a solution to the hallucination issues of general large models, enabling interaction with the physical world via programmatic interfaces. Tool LLM are much smaller, making it feasible to periodically be retrained with recent data. In addition, API documentation Retriever module can be added into model serving pipeline to help supplement the model with the most recent API documentation which is relevant to user’s input query.
To overcome these challenges, researchers have recently proposed two notable open-source methods for enhancing LLMs tool use abilities such as Gorilla LLM and ToolLLaMA, each having its own advantages and specific use cases. Moreover, those models can be prepared for inference serving on Backend.AI Cloud.
What is Tool LLM?
Tool LLM is an LLM which was trained on a dataset with user query and API request with relevant context information such as API code usage and API description documentation. The response from such LLM can be executed as a code. The code execution implies that the LLM can interact with various online services and tools. Such as Cloud Computing Providers, Kubernetes machine learning and Deep Learning libraries and repositories such as HuggingFace, TorchHub, TensorFlowHub.
The main advantage of such Tool LLM is ability to accurately generate an API response to user query which can be executed to obtain the results.
Understanding the Types of API
An Application Programming Interface (API) is a crucial element in modern computing, serving as a set of rules and protocols for how different software applications or hardware systems can communicate and interact.
Functional APIs are designed to be invoked through function calls within a programming environment. For instance, machine learning and deep learning libraries like HuggingFace and TensorFlow offer various models that can be loaded into memory and utilized through Functional API calls. These APIs are integral in executing specific functions and operations within the software.
This capability of LLM to generate a code related to an API extends their utility far beyond basic text generation and processing. Tool LLMs can seamlessly integrate with diverse online services and tools, ranging from cloud computing platforms to advanced machine learning libraries. Furthermore, their application is not limited to human queries; they can also be integrated into systems where they interact with other programs or AI agents. This versatility positions Tool LLMs as vital components in complex systems and infrastructures, enhancing their potential for real-world applications.
In the following sections, we'll delve into how Tool LLM were trained and how they are operated. After that two specific research examples will be covered such as Gorilla LLM and ToolLLaMA.
Tool LLM Training and Inference Workflow
Tool LLM training involves several steps which includes setting api database, creating a training dataset, model training and inference.
The API Database includes descriptions and relevant code samples. To generate a Self-Instruct training dataset there is a need to pre-process API database samples into {Input User Query-API Output} pairs. ChatGPT can help with automatically generating such dataset by covering various scenarios and query complexities which humans might ask. From specific cases to general and abstract cases. After Self-Instruct dataset is generated the model is trained to make accurate prediction in terms of API given user input query.
For Tool LLM inference, it's crucial that the LLM not only responds with accurate argument parameters but also uses the latest API documentation. Thus, API Document Retriever is used which helps to keep the model with the most recent API changes.

Figure 1. An overview workflow of Tool LLM training and inference over API instuction dataset
Case Studies: Gorilla LLM and ToolLLaMA
Gorilla
Gorilla, a fine-tuned LLaMA 7 billion-based model that outperforms GPT-4 in writing API calls. The notable aspects of Gorilla are:
- It addresses the limitations of current LLMs in generating accurate input arguments for APIs and their tendency to hallucinate incorrect API usage.
- Gorilla integrates with a document API retriever, allowing it to adapt to real-time changes in documentation, a significant advantage considering how frequently APIs get updated.
- The authors have developed a dataset called APIBench to evaluate the model's abilities, which includes APIs from HuggingFace, TorchHub, and TensorHub totaling 1600+ APIs.
- Gorilla seems to mitigate hallucination issues and improves the reliability of LLM outputs. Also, Gorilla got updated and extended to work with Cloud providers such as AWS, GCP and managing Kubernetes clusters.
ToolLLaMA
ToolLLaMA is a model which was fine-tuned on ToolBench an instruction-tuning dataset for tool based on RapidAPI repository. There are following keypoints of ToolLLaMA:
- ToolBench covers an impressive range of over 16,000 real-world APIs, offering diverse instruction sets and solution paths.
- The paper proposes a novel Depth-First Search-Based Decision Tree algorithm (DFSDT) to enhance the reasoning capabilities of LLMs such as multiple tool usage and multi-step reasoning.
- Finetuned ToolLLAMA on ToolBench matches the performance of ChatGPT and demonstrates the generalization abilities in out-of distribution datasets like APIBench.
Both papers are significant in pushing the boundaries of LLM’s capabilities in real-world tool use by navigating and utilizing a vast array of APIs. This advancement is crucial for practical applications. Below is a comparative summary table provided.

Figure 2. A comparative table between two API tuned LLM
Synergy between Backend.AI and ToolLLM
The training or model serving of LLM requires a significant computer resource, especially since there is a huge demand for Graphic Processing Units (GPU) with high capacity for RAM and computational speed.
Backend.AI offers a scalable foundation for building, training, and serving diverse models. Backend.AI includes scaling on demand feature for model inference with adding external node for serving and Load Balance to optimize the workload. Backend.AI has vLLM and TensorRT server which can be used for high performance inference of LLMs. In addition, there is a well-designed user-friendly interface and pipeline maker FastTrack tool to create computing environment sessions of various complexities.
Conclusion
The futuristic scenario which can be realized at present day where various AI Assistants and Agents interact with various devices and services are possible through API and Tool LLM specifically fine-tuned on such interactions. Gorilla LLM and ToolLLaMA offer a good opportunity to incorporate them in complex tasks. The workflow of how they trained and served is easy to comprehend. Gorilla LLM could be recommended to use for Machine Learning and cloud administration tasks. While ToolLLaMA for more general API usage, multi-tool, and multi-step cases.
There is also an advantage of training your own model on your own API documentation or code to have a LLM model which understands your code. Such LLM can be helpful at assisting or interacting with users who want to get the relevant information.
The Backend.AI can effectively to be a backbone for model training and providing scalable model serving while offering a simplistic GUI. How to set up such models and step by step guide will be explained in other parts.
Commonly asked questions:
- Q: What is source of hallucinations and LLM limitations and how it solved in Tool LLM?
- A: GPT-4, like other Large Language Models, faces limitations such as hallucinations and inaccuracies, which are primarily due to its training on extensive yet potentially outdated or inaccurate datasets from the internet. These 'hallucinations' refer to instances where the model confidently produces information that's either factually incorrect or not based in reality, a challenge stemming from the nature of its purely text-based training data and not directly from its size or lack of interaction with the physical world. To address these issues, Tool LLMs are being developed with a focus on specialization and frequent updates. They are fine-tuned on specific datasets, like API documentation, enabling direct interaction with real-world systems through programmatic interfaces for more accurate and current information. The retraining frequency of Tool LLMs varies, depending on the application and the pace of change in the relevant field, with updates potentially needed monthly, quarterly, or bi-annually to keep the model up-to-date with the latest trends and information.
- Q: What are example pairs of user Query and API?
- A: The example pairs are provided below.
- User Query: "Summarize this article about space exploration."
- API Output: HuggingFace.summarize(text="Article text here", model="facebook/bart-large-cnn")
- User Query: "What is the sentiment of this customer review?"
- API Output: HuggingFace.analyze_sentiment(text="Customer review text", model="distilbert-base-uncased-finetuned-sst-2-english")
- User Query: "Identify the objects in this photo."
- API Output: HuggingFace.image_recognition(image_file="path/to/photo.jpg", model="google/vit-base-patch16-224")
- User Query: "Convert this speech recording to text."
- API Output: HuggingFace.speech_to_text(audio_file="path/to/recording.wav", model="facebook/wav2vec2-base-960h")
- Q: How do the GorillaLLM and ToolLLaMA papers differ in their approach to utilizing API documentation during the training and inference of their models?
- A: GorillaLLM appends relevant API documentation during training and offers two inference modes, while ToolLLaMA employs Sentence-BERT for fine-tuning embeddings in the API domain. GorillaLLM uses BM25 and GPT-Retriever from LLamaIndex for documentation retrieval, whereas ToolLLaMA uses Sentence-BERT for a similar purpose.
- Q: How frequently should small API models be retrained, and what role does the API Retriever play in handling changes in API documentation?
- A: Training small API models annually is reasonable, but monthly retraining for API changes isn't practical. The API Retriever, using up-to-date documentation, can mitigate the need for frequent retraining. Evaluating and benchmarking fine-tuned API models and RAG methods is essential for effectiveness.
- Q: What is the difference between ToolLLM and RAG systems, and how do they function in the context of LLMs?
- A: ToolLLM is a model fine-tuned on API documentation, focusing on incorporating knowledge. RAG systems, on the other hand, are algorithms for data chunking, storage, search, re-ranking, and synthesis. They can work independently or in combination to enhance LLM efficiency, especially in handling context limits and knowledge updates.
Reference:
- Gorilla: Large Language Model Connected with Massive APIs. https://gorilla.cs.berkeley.edu/
- ToolLLM: Facilitating Large Language Models To Master 16000+ Real-World APIs. https://github.com/OpenBMB/ToolBench
- Part 1. Introduction to LLMs and Tool Interaction
- Part 2. Backend.AI Gorilla LLM model serving
- Part 3. Making own API Retriever and Question Answering system with few lines of code locally without training and serving LLM
28 January 2024

Introduce raftify: High-level Raft framework created with focusing on scalability
By Gyubong LeeHello, I've been working on introducing Raft to the Backend.AI manager processes at Lablup since last year.
Here's a rough breakdown of the related tasks I'm working on.
- Introducing Raft to the Backend.AI manager process and making it a leader-follower structure.
- Replacing the existing distributed lock-based GlobalTimer with a Raft-based global timer, and ensuring that a specific task is performed exactly once in the cluster.
- Embedding a global, shareable state store in the manager process and synchronizing it appropriately.
In this post, I'll introduce the Raft framework I've been shoveling over the past year to accomplish this task, some of the issues I've encountered while developing it, and walk through a raftify example code that implements a distributed key-value store in less than 300 lines of code in total.
Introducing raftify
raftify is a Raft framework developed with a focus on extensibility so that it can be easily integrated with any server application.
Among the Raft implementations utilized in production, tikv's raft-rs implementation was developed on top of raftify, using LMDB as stable storage and gRPC as the network layer.
Writing binding of the Raft module
I decided that building and maintaining a reliable Raft implementation from the ground up would be a significant burden, so I decided to write a Python binding for the Raft module first.
So I initially thought I'd try writing a Python binding using gopy, which is the most starred Raft implementation on GitHub, hashicorp/raft.
However, gopy didn't support the binding of
goroutine, and it didn't support the latest Python version.Then, on the advice of a senior developer in the company, I learned about a Rust implementation called tikv/raft-rs and PyO3, which inspired me to try writing a Python binding for tikv/raft-rs using PyO3.
rraft-py
Thus, I decided to develop a Python binding for Raft modules named rraft-py which is combined with Rust, Raft, and Py
My first concern in developing rraft-py was to make the semantics of the rust code and the python code as close to a 1:1 match as possible.
To achieve a 1:1 match, I needed to bypass some of the details of Rust's syntax.
My main concern at the time was how to expose Rust references to the Python side, which you can see in my PyCon KR presentation if you're interested.
The result is rraft-py, a port of over 10,000 lines of integration test code from raft-rs, which has become a fairly reliable implementation of Raft bindings that can be used directly in Python.
Currently, raftify is in the process of being completely rewritten in Rust, and rraft-py is no longer used, but it was a great experience to write my first PyO3 bindings and try out the APIs of a Raft implementation.
riteraft-py
After developing riteraft-py and porting over 10,000 lines of integration tests from raft-rs and even the multiple-mem-node example to python code to get it working, my only thought was that I still didn't know where to start.
The raft-rs really only provided the Raft implementation itself and I had no idea how to integrate it into my application.
While browsing GitHub, I came across a high-level Rust implementation based on tikv/raft-rs called riteraft in an issue called How to use this lib?, and it was much more intuitive to figure out how to use. So I decided to develop riteraft-py with the goal of mimicking its behavior in Python and integrating it at the application level.
The job of riteraft is to integrate this Raft implementation directly with Raft modules and logs, state machines, and network layers, but the problem was that it didn't work very well, apart from being intuitive to use.
Leader election not happening when the leader is dead, data replication not happening in certain scenarios, panic when the commit count goes over 255, etc... All sorts of miscellaneous issues had to be resolved.
Even after resolving all of these issues and getting the cluster to look like it was working, the issues kept coming: it would seem to be working fine, but then certain failures would cause catastrophic issues, such as cluster inconsistency or log synchronization locking up.
Each time we encountered an issue, we needed to be able to dig into the technical details of RAFT-RS and understand them, which ended up being a process of ripping apart RAFT-RS's code and understanding it piece by piece.
raftify
While troubleshooting the issue, I decided to use a different abstraction than riteraft and implemented many changes, including a CLI module for debugging node and cluster state, which led me to rename the library to raftify.
When I first started developing the library, the goal was to make it compatible with any Python application, hence the name raftify, which means to raftify.
I am no longer developing the Python implementation, but you can find it on its branch.
raftify written in Rust
Developed in Python on top of rraft-py, raftify ended up working well, but the crude test harness written in a multi-process structure was hard to test in CI, easily broke cluster consistency, and got out of control at the slightest hint of code complexity.
As a result, we decided to completely rewrite raftify's internal logic in Rust and expose only the high-level interface of the Raft package in Python.
Once completely rewritten in Rust, raftify was single-threaded, integration testable, and could be tested in CI, which helped eliminate the fear of making code changes.
raftify example code
In this section, we'll create a simple distributed key-value store using raftify.
For the full source code, see this link.
Define the state machine
The first thing we need to do is define the log entries and state machine that we will use in our key-value store.
For the sake of this article, we'll just define a simple
Inserttype command that defines a value as a log entry.💡 Disclaimer: This article does not explain the Rust language syntax and the theoretical background of Raft.
#[derive(Clone, Debug, Serialize, Deserialize)]
pub enum LogEntry {
    Insert { key: u64, value: String },
}
Let's define a state machine of type
HashMapas shown below.#[derive(Clone, Debug)] pub struct HashStore(pub Arc<RwLock<HashMap<u64, String>>>);Then we need to define
encodeanddecodemethods to indicate how we want to serialize and deserialize these data structures. You can use the bincode crate to define these as simply as below.impl AbstractLogEntry for LogEntry { fn encode(&self) -> Result<Vec<u8>> { serialize(self).map_err(|e| e.into()) } fn decode(bytes: &[u8]) -> Result<LogEntry> { let log_entry: LogEntry = deserialize(bytes)?; Ok(log_entry) } } impl AbstractStateMachine for HashStore { fn encode(&self) -> Result<Vec<u8>> { serialize(&self.0.read().unwrap().clone()).map_err(|e| e.into()) } fn decode(bytes: &[u8]) -> Result<Self> { let db: HashMap<u64, String> = deserialize(bytes)?; Ok(Self(Arc::new(RwLock::new(db)))) } }Finally, we need to define three methods in the HashStore that will be used by raftify's internal code.
Define
apply, a method that will be called when a new log entry is applied to the HashStore,snapshot, which will be called when saving the current state of the HashStore as a snapshot, andrestore, which will be called when restoring the state of the HashStore via a snapshot byte slice, as shown below.#[async_trait] impl AbstractStateMachine for HashStore { async fn apply(&mut self, data: Vec<u8>) -> Result<Vec<u8>> { let log_entry: LogEntry = LogEntry::decode(&data)?; match log_entry { LogEntry::Insert { ref key, ref value } => { let mut db = self.0.write().unwrap(); log::info!("Inserted: ({}, {})", key, value); db.insert(*key, value.clone()); } }; Ok(data) } async fn snapshot(&self) -> Result<Vec<u8>> { Ok(serialize(&self.0.read().unwrap().clone())?) } async fn restore(&mut self, snapshot: Vec<u8>) -> Result<()> { let new: HashMap<u64, String> = deserialize(&snapshot[..]).unwrap(); let mut db = self.0.write().unwrap(); let _ = std::mem::replace(&mut *db, new); Ok(()) } }Define the web server API
Let's define the web server API that will be used in our example. We will use this API to access the Raft object on the node and manipulate the HashStore.
For our example, we'll use the actix-web crate and define it as shown below.
The put command can be implemented by calling the
proposemethod on the RaftNode of the Raft object. We can do this by encoding theInserttype LogEntry we defined earlier and passing it as an argument to theRaftNode::proposemethod.The get command can be implemented by returning the value corresponding to the id from the HashMap stored in memory.
#[get("/put/{id}/{value}")]
async fn put(data: web::Data<(HashStore, Raft)>, path: web::Path<(u64, String)>) -> impl Responder {
    let log_entry = LogEntry::Insert {
        key: path.0,
        value: path.1.clone(),
    };
    data.1.raft_node.propose(log_entry.encode().unwrap()).await;

    "OK".to_string()
}

#[get("/get/{id}")]
async fn get(data: web::Data<(HashStore, Raft)>, path: web::Path<u64>) -> impl Responder {
    let id = path.into_inner();

    let response = data.0.get(id);
    format!("{:?}", response)
}

let web_server = tokio::spawn(
    HttpServer::new(move || {
        App::new()
            .app_data(web::Data::new((store.clone(), raft.clone())))
            .service(put)
            .service(get)
    })
    .bind(addr)
    .unwrap()
    .run(),
);
Bootstrap a Raft cluster
Next, let's bootstrap a cluster of RaftNodes.
If the
--peer-addrargument is given, send a join request to the cluster to get a newnode_idvia peer-addr and bootstrap a new cluster if this argument is not given.Leader
In this example, we'll stick with the
node_idof the leader node for intuitive understanding. This means that when we callRaft::bootstrap_cluster, we can create a Raft object of the leader node by passing 1 to thenode_id. After that, we can call theRaft::runmethod and the RaftNode will run.Followers
As shown below, after calling
Raft::request_idto receive aClusterJoinTicketthat can be used to join the cluster, you will callRaft::new_followerwith the specifiednode_idto create a follower Raft node object, call theRaft::runmethod to have the RaftNode run, and join the cluster via theRaft::joinmethod.let (raft, raft_handle) = match peer_addr { Some(peer_addr) => { log::info!("Running in Follower mode"); let ticket = Raft::request_id(raft_addr, peer_addr.clone(), logger.clone()).await.unwrap(); let node_id = ticket.reserved_id; let raft = Raft::new_follower( node_id, raft_addr, store.clone(), cfg, None, logger.clone(), )?; let handle = tokio::spawn(raft.clone().run()); raft.join(ticket).await; (raft, handle) } None => { log::info!("Bootstrap a Raft Cluster"); let node_id = 1; let raft = Raft::bootstrap_cluster( node_id, raft_addr, store.clone(), cfg, None, logger.clone(), )?; let handle = tokio::spawn(raft.clone().run()); (raft, handle) } }; let _ = tokio::try_join!(raft_handle)?;You can now bootstrap a Raft cluster of three nodes in the terminal as shown below.
$ ./target/debug/memstore --raft-addr=127.0.0.1:60061 --web-server=127.0.0.1:8001
$ ./target/debug/memstore --raft-addr=127.0.0.1:60062 --peer-addr=127.0.0.1:60061 --web-server=127.0.0.1:8002
$ ./target/debug/memstore --raft-addr=127.0.0.1:60063 --peer-addr=127.0.0.1:60061 --web-server=127.0.0.1:8003
Test
We can now try out the key-value store we defined through the
actix-webserver API via thecurlcommand.❯ curl http://localhost:8001/put/1/test OK ❯ curl http://localhost:8001/get/1 Some("test")If you're interested in learning more, you can check out the raftify repository for instructions on how to use the CLI module to help with debugging, example code for
RaftServiceClient, and more.Summary
raftify is an experimental framework that aims to make it easier for anyone to integrate Raft modules that are otherwise hard to access by the normal developer.
It was developed to introduce a leader-follower structure to Backend.AI manager processes, but as I've shown in this post, it could be used in a variety of places where you need an HA structure, such as creating your own simple distributed key-value store with short source code.
If you're intrigued by the inner workings of the
tikv/raft-rsimplementation, stay tuned for my next post where I'll be analyzing what happens inside the source code line by line in a few scenarios.This post is automatically translated from Korean
26 January 2024

Raft Consensus algorithm for Backend.AI: Leader election
By Jeongseok KangHigh availability (HA) has become an indispensable concept when talking about modern applications. High availability is the ability of an IT system to remain nearly 100% accessible and reliable at all times by eliminating or minimizing downtime^1. Backend.AI, which is developed and serviced by Rableup, also employs various methods to maintain high availability.
 Backend.AI architecture
Background
Backend.AI consists of many different components, including managers and agents, storage proxies, and web servers. Each of these components runs as multiple processes in a distributed environment to increase reliability, especially the manager, which is responsible for scheduling session execution and many core functions of Backend.AI. Currently, the manager has an Active-Active HA structure that ensures high availability through load balancing.
One of the many features of the Backend.AI Manager is event handling. Backend.AI raises various events, such as
AgentStartedEventandDoScheduleEvent, to track the lifecycle of agents and sessions and provide optimal scheduling. For example, when a Backend.AI Agent process runs, it generates anAgentStartedEvent, and the Backend.AI Manager process receives this event and performs a specific action (schedule()). Backend.AI Manager also raises aDoScheduleEventinternally to ensure periodic scheduling. This is where the problem arises. If you are running multiple Backend.AI Manager processes for high availability, having each process raise an event with its own timer adds unnecessary load and can cause the health of the entire system to be unreliable. The Backend.AI Manager implements a GlobalTimer to ensure that only one manager process generates events within the same system. TheGlobalTimeruses distributed locks to ensure mutual exclusivity between processes and to ensure that only one process generates events.@preserve_termination_log async def generate_tick(self) -> None: try: await asyncio.sleep(self.initial_delay) if self._stopped: return while True: try: async with self._dist_lock: if self._stopped: return await self._event_producer.produce_event(self._event_factory()) if self._stopped: return await asyncio.sleep(self.interval) except asyncio.TimeoutError: # timeout raised from etcd lock if self._stopped: return log.warn("timeout raised while trying to acquire lock. retrying...") except asyncio.CancelledError: passCurrently, Backend.AI provides an interface for distributed locks, [AbstractDistributedLock] (https://github.com/lablup/backend.ai/blob/2f90d03c4477eda8e0beeabb7fe4b067c56dae09/src/ai/backend/common/lock.py#L33-L44), and we have developed and are using [
FileLock] (https://github.com/lablup/backend.ai/blob/2f90d03c4477eda8e0beeabb7fe4b067c56dae09/src/ai/backend/common/lock.py#L47-L142), [EtcdLock] (https://github.com/lablup/backend.ai/blob/2f90d03c4477eda8e0beeabb7fe4b067c56dae09/src/ai/backend/common/lock.py#L145-L190) based on the [etcd concurrency API] (https://etcd.io/docs/v3.5/dev-guide/api_concurrency_reference_v3/), and [RedisLock] (https://github.com/lablup/backend.ai/blob/2f90d03c4477eda8e0beeabb7fe4b067c56dae09/src/ai/backend/common/lock.py#L193-L248) based on [Redis Lock] (https://redis.io/docs/manual/patterns/distributed-locks/) as actual implementations.etcd is a distributed, open-source key-value store used to store and manage critical information needed to keep distributed systems running^2, most notably in Kubernetes.
class AbstractDistributedLock(metaclass=abc.ABCMeta):
    def __init__(self, *, lifetime: Optional[float] = None) -> None:
        assert lifetime is None or lifetime >= 0.0
        self._lifetime = lifetime

    @abc.abstractmethod
    async def __aenter__(self) -> Any:
        raise NotImplementedError

    @abc.abstractmethod
    async def __aexit__(self, *exc_info) -> Optional[bool]:
        raise NotImplementedError
Requirements
The
GlobalTimerdoes a good job of controlling event generation on a per-process basis in a distributed environment. However, requirements are always changing and the software needs to change with them. This time, the added requirement was to implement a rate limit for requests. With the current load balancing scheme, we can't guarantee that every request is handled by the same manager, which can lead to the following problems because the state of each manager is not shared.1. Set the counters for both managers to 0 and the request count limit to 1. 2. The first request is received by manager 1. 3. Increase the counter on manager 1 by 1. (C1: 0 -> 1) 4. The counter reaches the maximum allowed number of requests and the next request is rejected. 5. Manager 2 receives the second request due to load balancing. 6. The counter on manager 2 has not reached the maximum allowed number of times because it is still 0. (C2: 0) 7. Manager 2 processes the request. 8. The request count limit didn't work!Therefore, the following issue has been proposed to discuss ways to improve these limitations.
 Issue suggesting improvements to distributed timers (lablup/backend.ai#415)
To delegate global state management to a single manager process, represented by a leader, we investigated consensus algorithms and decided to use the Raft Consensus Algorithm (hereafter Raft), which is used in projects such as etcd, which is used as a repository in Kubernetes (https://kubernetes.io/docs/concepts/overview/components/#etcd), and which we believe has been well validated.
Raft consensus algorithm
The Raft algorithm was proposed in "In Search of an Understandable Consensus Algorithm"^3 submitted to USENIX in 2014. It was created to improve upon Paxos^4, the leading algorithm at the time, which was difficult to understand and implement in practice due to its complex consensus process, hence the title.
But our most important goal — and most difficult challenge — was understandability.
- In Search of an Understandable Consensus Algorithm
A Raft cluster typically consists of five nodes, because a maximum of two nodes can fail and still satisfy a
quorumto maintain the system. Each node in a cluster has one of three states: leader, follower, or candidate. In general, there can be at most one leader in each cluster, with the rest of the nodes being followers.Glossary #1
- quorum: The minimum number of people required to make a decision. (N/2+1)
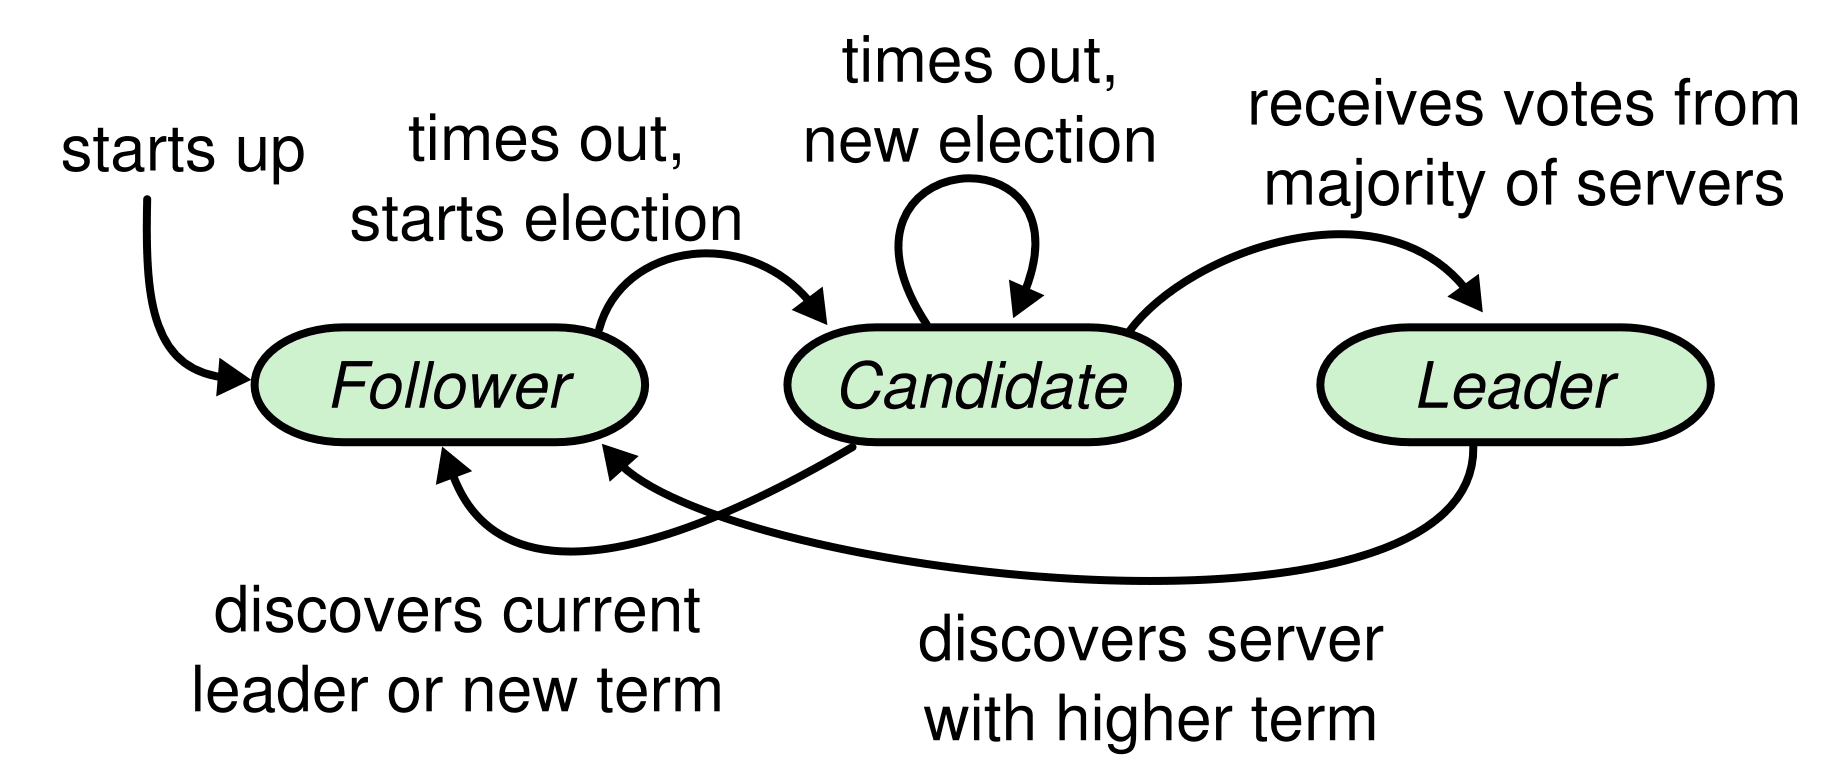 State transition diagram of a Raft node (Source: In Search of an Understandable Consensus Algorithm)
The Raft algorithm delegates all power to an elected leader and makes the flow of logs unidirectional, making it easier to understand the overall picture. The Raft algorithm has the following characteristics
Glossary #2
- term: The generation of the current leader or candidate. Incremented by 1 each time a leader election begins.
- index: Refers to the location of a specific value in the log.
- commit: Indicates that a specific value from the log was applied to the state machine.
- commitIndex: Highest index that successfully commits
- Election Safety: Each term has a maximum of one leader.
- Leader Append-Only: Readers cannot overwrite or delete logs, they can only add new ones.
- Log Matching: If two logs have values with the same index and term, all values up to that index are the same.
- Leader Completeness: If a value is committed to the log in a particular term, all subsequent generations of readers are guaranteed to have that value.
- State Machine Safety: If one server applies a log value from a particular index to its state machine, another server cannot apply a different value from the same index.
Using the above features, Raft divides the entire consensus process into three independent parts.
- Leader election: If the existing leader is not working, a new leader must be elected.
- Log replication: The leader replicates the request logs it receives from clients to other nodes. The other nodes unconditionally accept the leader's logs.
- Safety: When one server applies a log value from a particular index to its state machine, another server cannot apply a different value from the same index.
In this article, we'll discuss the different states a Raft node can be in, and implement the leader election process in code.
Follower
Followers do not send requests themselves, but only receive and respond to requests from the leader or candidate. The Behavior Spec for a Follower proposed in the paper and the code written based on it is shown below.
- Handle RPC requests from leaders and candidates.
async def on_append_entries( self, *, term: int, leader_id: RaftId, prev_log_index: int, prev_log_term: int, entries: Iterable[raft_pb2.Log], leader_commit: int, ) -> Tuple[int, bool]: await self._reset_timeout() if term < (current_term := self.current_term): return (current_term, False) await self._synchronize_term(term) return (self.current_term, True) async def on_request_vote( self, *, term: int, candidate_id: RaftId, last_log_index: int, last_log_term: int, ) -> Tuple[int, bool]: await self._reset_timeout() async with self._vote_request_lock: if term < (current_term := self.current_term): return (current_term, False) await self._synchronize_term(term) async with self._vote_lock: if self.voted_for in [None, candidate_id]: self._voted_for = candidate_id return (self.current_term, True) return (self.current_term, False) async def _synchronize_term(self, term: int) -> None: if term > self.current_term: self._current_term.set(term) await self._change_state(RaftState.FOLLOWER) async with self._vote_lock: self._voted_for = None- If you don't receive any requests from leaders or candidates for a period of time, you'll be placed in candidate status.
async def _wait_for_election_timeout(self, interval: float = 1.0 / 30) -> None:
    while self._elapsed_time < self._election_timeout:
        await asyncio.sleep(interval)
        self._elapsed_time += interval
    await self._change_state(RaftState.CANDIDATE)
Leaders must periodically announce their presence by sending heartbeat messages to their followers. If a follower does not receive any messages for a certain amount of time (
election_timeout), it assumes that the cluster is leaderless and starts an election by becoming a candidate to become the new leader.Candidate
The candidate's behavior statement and implementation code is as follows
- Become a follower when you receive the
AppendEntriesRPC request from the new leader (seeon_append_etries()for followers). - Start the election with the following procedure
- Increase term by 1. (term += 1)
- Vote for yourself.
- Initialize the election timeout.
- Send a
RequestVoteRPC request to the other nodes.
async def _start_election(self) -> None: self._current_term.increase() async with self._vote_lock: self._voted_for = self.id current_term = self.current_term terms, grants = zip( *await asyncio.gather( *[ asyncio.create_task( self._client.request_vote( to=server, term=current_term, candidate_id=self.id, last_log_index=0, last_log_term=0, ), ) for server in self._configuration ] ) )- If you receive votes from a majority of nodes, you are the leader.
for term in terms: if term > current_term: await self._synchronize_term(term) break else: if sum(grants) + 1 >= self.quorum: await self._change_state(RaftState.LEADER)- If the election timeout occurs, start a new election.
case RaftState.CANDIDATE:
    while self.__state is RaftState.CANDIDATE:
        await self._start_election()
        await self._reset_election_timeout()
        await self._initialize_volatile_state()
        if self.has_leadership():
            await self._initialize_leader_volatile_state()
            break
        await asyncio.sleep(self.__election_timeout)
Leader
- Send the first heartbeat message (an empty
AppendEntriesrequest) immediately after the election. Send heartbeat messages periodically thereafter.
async def _publish_heartbeat(self) -> None: if not self.has_leadership(): return terms, successes = zip( *await asyncio.gather( *[ asyncio.create_task( self._client.append_entries( to=server, term=self.current_term, leader_id=self.id, prev_log_index=0, prev_log_term=0, entries=(), leader_commit=self._commit_index, ), ) for server in self._configuration ] ) ) for term in terms: if term > self.current_term: await self._synchronize_term(term) break- When it receives a request from a client, it adds a value to the log. After applying that value to the state machine, send a response to the request.
- If the follower has a log value with an index greater than the value the leader is tracking (nextIndex), replicate the log to the follower starting at nextIndex.
- If successful, update the leader's nextIndex and matchIndex.
- If it fails due to an inconsistency, it decrements the leader's nextIndex and tries again.
- If the value (N) below exists, update the commitIndex to that value.
- The majority of matchIndexes are greater than or equal to N (matchIndex >= N)
- The term of the Nth log is the same as the current term
The leader manages a nextIndex and a matchIndex for each follower.
- nextIndex: The next index that should be sent to each follower.
- matchIndex: the highest index that was successfully replicated to each follower
Conclusion
In this article, we've briefly covered the Raft algorithm and written code to perform a leader election. The remaining two features (log replication, membership changes) will face a variety of challenges in actual implementation, including timing issues. If you're interested in learning more about the Raft algorithm, we recommend reading the author's (Diego Ongaro) PhD thesis (CONSENSUS: BRIDGING THEORY AND PRACTICE)^6.
Finally, let's end by checking out how ChatGPT describes the Raft algorithm.
 Raft algorithm explained by ChatGPT (Source: OpenAI ChatGPT 3.5)
This article is based on the code in lablup/aioraft-ng. Please also pay attention to lablup/raftify, the next generation Raft project currently under development at Lablup.
29 November 2023

Backend.AI Model Service Hands-on: Running GPT-NeoX
By Kyujin ChoBackend.AI version 23.09 has been officially released to the public. We covered Model Service, a key feature in version 23.09, in our previous Sneak Peek: Backend.AI Model Service preview article. Since then, we have added a variety of new features, including GUI support, authentication token history management, and more, and we are going to walk you through them in a tutorial format to make it easy to understand the Backend.AI Model Service. In this tutorial post, we will show you how to use the Backend.AI Model Service to run GPT-NeoX models on top of Triton Inference Server. Triton Inference Server is an open source model inference framework from NVIDIA that enables easy HTTP and gRPC1 delivery of its TritonRT, FasterTransformer, and TritonRT-LLM models, as well as PyTorch, TensorFlow, vLLM, and many others.
Create a Model VFolder
- Navigate to the Data & Folders tab. Click the "New Folder" button to open the VFolder creation dialog.

- Create a new model folder. It does not matter how you name the folder, but make sure to set the "Usage" at the bottom to "Model". Once you have specified all the values, click the "Create" button at the bottom. Your model VFolder has now been created.

FasterTransformer Format Model Conversion
- Navigate to the "Sessions" tab. Click the "Start" button to open the session creation dialog.
- Select
ngc-pytorchfor "Running Environment" and23.07for "Version". Once you have made your selections, click the arrow icon in the lower right corner.
- The window to select the VFolder to mount in the session. To load the model, select the VFolder you just created under the "Model storage folder to mount" section. Once you have made your selections, click the arrow icon in the lower right corner.

- A window to specify the amount of resources to be used by the model session. You should allocate at least 16 CPU cores and 128 GB of RAM to ensure smooth model conversion. Once you have made your selections, click the arrow icon in the lower right corner.

- After confirming that all settings have been applied correctly, click the "Start" button below to start the session.

- Once the session is created, a popup will appear to select an app, as shown below. Click the "Console" app to access the terminal environment.


- Run the following shell script to download the GPT-NeoX 20B model and convert it to the FasterTransformer format. Note that where the script mentions
<VFolder name>, you must replace it with the name of the model VFolder you created.
cd /home/work/<VFolder name>
pip install -U transformers bitsandbytes
git clone https://github.com/NVIDIA/FasterTransformer
git clone https://huggingface.co/ElutherAI/gpt-neox-20b
cd neo-gptx-20b
git lfs install
git lfs pull
The GPT-NeoX 20B model requires at least 40GB of VRAM to run. If the physical GPU you are using has less VRAM than this and you need to split the model across multiple GPUs, adjust the number in the
-i_gparameter to match the number of GPUs you are using.cd /home/work/<VFolder name> mkdir -p triton-deploy/gpt-neox-20b-ft python ~/<VFolder name>/FasterTransformer/examples/pytorch/gptneox/utils/huggingface_gptneox_convert.py \ -i /home/work/<VFolder name>/gpt-neox-20b \ -o /home/work/<VFolder name>/triton-deploy/gpt-neox-20b-ft \ -i_g 1 \ -m_n GPT-NeoX-20B
- If you followed all the steps up to step 7, you should have the following folders under the VFolder.
work@main1[PRRLCIqu-session]:~/GPT-NeoX-Triton-FT$ ls -al
total 62
drwxr-xr-x  5 work work 11776 Oct 12 12:14 .
drwxr-xr-x  9 work work  4096 Oct 12 12:29 ..
drwxr-xr-x 14 work work 12800 Oct 12 11:24 FasterTransformer
drwxr-xr-x  3 work work 16896 Oct 12 10:18 gpt-neox-20b
drwxr-xr-x  3 work work 11776 Oct 12 11:56 triton-deploy
Now it's time to add the configuration file for Triton Inference Server. Create the file
triton-deploy/gpt-neox-20b-ft/config.pbtxtand add the following contents.If you set the value of the
-i_gparameter to anything other than 1 in step 7, you must modify the value oftensor_para_sizein the settings below to match the value of-i_g.name: "gpt-neox-20b-ft" backend: "fastertransformer" default_model_filename: "gpt-neox-20b-ft" max_batch_size: 1024 model_transaction_policy { decoupled: False } input [ { name: "input_ids" data_type: TYPE_UINT32 dims: [ -1 ] }, { name: "start_id" data_type: TYPE_UINT32 dims: [ 1 ] reshape: { shape: [ ] } optional: true }, { name: "end_id" data_type: TYPE_UINT32 dims: [ 1 ] reshape: { shape: [ ] } optional: true }, { name: "input_lengths" data_type: TYPE_UINT32 dims: [ 1 ] reshape: { shape: [ ] } }, { name: "request_output_len" data_type: TYPE_UINT32 dims: [ -1 ] }, { name: "runtime_top_k" data_type: TYPE_UINT32 dims: [ 1 ] reshape: { shape: [ ] } optional: true }, { name: "runtime_top_p" data_type: TYPE_FP32 dims: [ 1 ] reshape: { shape: [ ] } optional: true }, { name: "beam_search_diversity_rate" data_type: TYPE_FP32 dims: [ 1 ] reshape: { shape: [ ] } optional: true }, { name: "temperature" data_type: TYPE_FP32 dims: [ 1 ] reshape: { shape: [ ] } optional: true }, { name: "len_penalty" data_type: TYPE_FP32 dims: [ 1 ] reshape: { shape: [ ] } optional: true }, { name: "repetition_penalty" data_type: TYPE_FP32 dims: [ 1 ] reshape: { shape: [ ] } optional: true }, { name: "random_seed" data_type: TYPE_UINT64 dims: [ 1 ] reshape: { shape: [ ] } optional: true }, { name: "is_return_log_probs" data_type: TYPE_BOOL dims: [ 1 ] reshape: { shape: [ ] } optional: true }, { name: "beam_width" data_type: TYPE_UINT32 dims: [ 1 ] reshape: { shape: [ ] } optional: true }, { name: "bad_words_list" data_type: TYPE_INT32 dims: [ 2, -1 ] optional: true }, { name: "stop_words_list" data_type: TYPE_INT32 dims: [ 2, -1 ] optional: true }, { name: "prompt_learning_task_name_ids" data_type: TYPE_UINT32 dims: [ 1 ] reshape: { shape: [ ] } optional: true }, { name: "top_p_decay" data_type: TYPE_FP32 dims: [ 1 ] reshape: { shape: [ ] } optional: true }, { name: "top_p_min" data_type: TYPE_FP32 dims: [ 1 ] reshape: { shape: [ ] } optional: true }, { name: "top_p_reset_ids" data_type: TYPE_UINT32 dims: [ 1 ] reshape: { shape: [ ] } optional: true } ] output [ { name: "output_ids" data_type: TYPE_UINT32 dims: [ -1, -1 ] }, { name: "sequence_length" data_type: TYPE_UINT32 dims: [ -1 ] }, { name: "cum_log_probs" data_type: TYPE_FP32 dims: [ -1 ] }, { name: "output_log_probs" data_type: TYPE_FP32 dims: [ -1, -1 ] } ] instance_group [ { count: 1 kind: KIND_CPU } ] parameters { key: "tensor_para_size" value: { string_value: "1" } } parameters { key: "pipeline_para_size" value: { string_value: "1" } } parameters { key: "data_type" value: { string_value: "fp16" } } parameters { key: "model_type" value: { string_value: "GPT-NeoX" } } parameters { key: "model_checkpoint_path" value: { string_value: "/models/triton-deploy/gpt-neox-20b-ft/1-gpu" } } parameters { key: "enable_custom_all_reduce" value: { string_value: "0" } }- Finally, you need to add the Backend.AI Model Service definition file to the root of the VFolder, under
model-definition.yaml(model-definition.ymlis also acceptable). Let's take a closer look at the model definition file for running Triton Inference Server.
models:
- name: "GPT-NeoX"
  model_path: "/models/triton-deploy"
...
This is where you specify the model name and the path to the model.
The name and path you set here can be accessed by the model server process as the
BACKEND_MODEL_NAMEandBACKEND_MODEL_PATHenvironment variables, respectively.
...
  service:
    start_command:
      - tritonserver
      - --model-repository=/models/triton-deploy
      - --disable-auto-complete-config
      - --log-verbose
      - "1"
...
This is the part that defines the command line syntax for starting the Model Server process.
...
    port: 8000
...
This is where you fill in the port for API communication that the model server process exposes. If not specified, Triton Inference Server exposes port
8000for HTTP API communication by default, so you will also write that port in the model definition file.... health_check: path: /v2/health/ready max_retries: 3 max_wait_time: 5 expected_status_code: 200This is where you enable and set up the Health Check feature. If the Health Check feature is enabled, Backend.AI will continuously send HTTP GET requests to the path to verify that it returns an HTTP response code corresponding to the
expected_status_code(can be omitted, defaults to200). If the model server does not respond, or returns an undefined response code, Backend.AI determines that the session is unhealthy and excludes it from the service. When a session is excluded from the service, it is not automatically terminated and the Model Service administrator must manually take the appropriate action by checking container logs, etc. The Health Check feature can be disabled by omitting the syntax entirely. If you do this, Backend.AI will not check the health of the model server and will always assume it is in a healthy state. Themax_wait_timeis the part that defines the API response timeout. It must be a number in seconds. Themax_retriesis the number of times the request is retried before the model server is judged to be unhealthy.
The finished model definition file looks like this.models: - name: "GPT-NeoX" model_path: "/models/triton-deploy" service: start_command: - tritonserver - --model-repository=/models/triton-deploy - --disable-auto-complete-config - --log-verbose - "1" port: 8000 health_check: path: /v2/health/ready max_retries: 3 max_wait_time: 5More information about model definition files can be found in the Backend.AI WebUI documentation.
Now you're all set to run the Model Service.
Create a Model Service
- Navigate to the "Model Serving" tab. Click the "Start Service" button to open the Create Model Service window.

 Let's take a look at each section in a little more detail.
 Service name: This is where you specify the name of the Model Service. The name of the Model Service can be used as a subdomain of the Model Service Endpoint (coming soon).
 Resource Group: This is the field to select the resource group where the Inference Session for the Model Service will be created.
 Open your app to the outside world: When this feature is enabled, all API requests to the model server must be accompanied by an authentication header before they can be made. For more information about Model Service authentication, see the Backend.AI WebUI documentation.
 Desired number of routes: A field to specify the number of inference sessions the Model Server process runs in. Setting this value to a number greater than 1 creates multiple identical sessions and enables the round-robin load balancer feature, which distributes API requests evenly among these sessions. This value can be modified at any time after Model Service creation.
 A panel that specifies the amount of resources for the inference session.
The GPT-NeoX 20B model requires a minimum of 40 GB of vRAM to run. The relationship between fGPU units and vRAM in Backend.AI may apply differently depending on the settings of your Backend.AI. Consult with the administrator of your Backend.AI for more information. If you have set all the values correctly, press the "OK" button to create the Model Service.
- the Model Service has been created. If the Model Service is not yet ready for the model process in the reasoning session, the status will remain "PROVISIONING".
 Click on the "INFERENCE" section of the "Sessions" tab and you'll see that an inference session has been created corresponding to the Model Service you created in 1.
 Model Service administrators can click the clipboard icon in the "Control" row to view logs related to the model server processes in an inference session.

- When the Model Server process is running normally, the status of the route at the bottom and the status at the top will both change to "HEALTHY", and the address to access the Model Service will appear under "Service Endpoints".
 You can now access the Triton Inference Server that ran the inference session through that address.

Conclusion
In this article, you've learned how to start serving LLM models using the Backend.AI Model Service. The Model Service feature is available in Backend.AI's Cloud Beta. Start serving your own models today!
1: Not supported by Backend.AI Model Service
This post is automatically translated from Korean
21 November 2023
- Navigate to the Data & Folders tab. Click the "New Folder" button to open the VFolder creation dialog.

High sky and plump horses, and Container Dieting
By Mario (Manseok) ChoIntroduction
Most Linux distributions, such as Ubuntu, RedHat, and CentOS, use glibc as the system's standard C library. When you install a library package, such as OpenSSL, with apt on Ubuntu or rpm (yum) on the RedHat line, it is dynamically linked with glibc by default.
GNU (Gnu) is an operating system and includes a wide range of computer software. GNU is open source, developed and maintained by the Free Software Foundation (FSF). Examples of things created by GNU include compilers and development tools such as GCC, G++, and Make. GNU uses glibc as its standard C library. glibc uses the GNU Lesser General Public License.
musl is a Linux standard C library distributed under the MIT license. Its developer is Rich Felker, and while glibc uses dynamic linking, musl aims to implement a standard C library that conforms to POSIX standards using static linking. It also implements non-standard features of Linux, BSD, and glibc.
Differences between glibc and musl in the Linux environment
When you install a package on Linux, it uses glibc by default. If you've ever built a C/C++ program using gcc, you've most likely done a glibc-based dynamic link build. However, in addition to this common glibc dynamic build, you can also do a MUSL-based dynamic/static build.
There are the following differences between
*-linux-gnuand*-linux-musl.| Build targets | Standard C libraries | Linking method |----------------|-------------------|----------------| |
*-linux-gnu| glibc | dynamic linking | |*-linux-musl| musl | dynamic/static linking |Consider the case of building an executable with Rust. When you install Rust on a Linux environment using
rustup,*-linux-gnuis selected as the default target.If you don't specify any other options, Rust will build the binary with the
*-linux-gnutarget and dynamically link it with glibc. To run a binary built in this way, you must have glibc installed in your Linux environment for it to work. If the binary relies on external libraries such as OpenSSL (if it is dynamically linked), you will also need to install those libraries via a package manager such as apt. If you want to run these dynamically linked binaries as a regular user, you can bundle them into a package like a DEB or RPM that describes the dependencies on external libraries. The package manager will then automatically find and install the appropriate dependent libraries. However, if you're using a library that isn't registered with the package manager, or even the same library, there are subtle compatibility issues between the installed version and the version you used to develop it, there's a chance that the binary you build won't run as intended.If you specify the
*-linux-musltarget, Rust will statically link with musl when building the binary. If you rely on external libraries like OpenSSL, it will also statically link those as well, embedding them all into the binary. This means that you end up with all of these libraries inside a single binary file in Rust. This static binary can run on any Linux environment, as long as it matches the CPU architecture and the set of system calls provided by the Linux kernel. This makes it easier to distribute binaries because you only need to pass a single binary to run it, rather than using a package like a DEB or RPM.If this makes deploying binaries so easy, why isn't the
*-linux-musltarget the default for Linux environments?The reason is that using MUSL makes build preparation somewhat more complicated. This is because if a developer-created binary package uses
*-linux-musland also relies on external libraries, those external libraries must also be statically linked with musl instead of dynamically linked with glibc. This means that all dependent libraries, as well as the main body of the program you want to build using the compiler for musl, must be built as static links from source code.Fortunately, you don't have to build everything from scratch if it's a commonly used external library in Rust. By utilizing a Docker image that bundles frequently used libraries with the Rust compiler/gcc, you can easily create a musl-based static build. (In the command examples that follow, I'll arbitrarily use the
<distro>#prompt to distinguish the container environment for each Linux distribution).$ docker run -it --name ubuntu ubuntu:22.04 bash ubuntu# apt update && apt install -y curl gcc vimLet's configure a dynamic link, glibc, and a static link, musl, in the Rust language environment, which is commonly used for development. First, install Rust on your Ubuntu environment.
ubuntu# curl --proto '=https' --tlsv1.2 -sSf https://sh.rustup.rs | sh
ubuntu# source $HOME/.cargo/env
Let's compare dynamic and static linking using Rust's default example, "Hello World" output.
First, let's build "Hello World" using glibc.
ubuntu# cd
ubuntu# cargo new --bin hello && cd $_
     Created binary (application) `hello` package
ubuntu# cargo build --release
   Compiling hello v0.1.0 (/root/hello)
    Finished release [optimized] target(s) in 0.35s
Let's use the
lddcommand to verify that the library is configured as a dynamic link in the glibc environment. We can see thatlinux-vdso,libgcc_s,libc, etc. are configured as dynamic links.ubuntu# ldd target/release/hello linux-vdso.so.1 (0x00007fffe87df000) libgcc_s.so.1 => /lib/x86_64-linux-gnu/libgcc_s.so.1 (0x00007fdce9c3f000) libc.so.6 => /lib/x86_64-linux-gnu/libc.so.6 (0x00007fdce9a17000) /lib64/ld-linux-x86-64.so.2 (0x00007fdce9cc2000)So let's change the RUST target configuration with a MUSL static link.
ubuntu# rustup target add x86_64-unknown-linux-musl
info: downloading component 'rust-std' for 'x86_64-unknown-linux-musl'
info: installing component 'rust-std' for 'x86_64-unknown-linux-musl'
 34.7 MiB / 34.7 MiB (100%) 8.6 MiB/s in 4s ETA: 0s

ubuntu# rustup show
Default host: x86_64-unknown-linux-gnu
rustup home: /root/.rustup

installed targets for active toolchain
--------------------------------------

x86_64-unknown-linux-gnu
x86_64-unknown-linux-musl

active toolchain
----------------

stable-x86_64-unknown-linux-gnu (default)
rustc 1.72.0 (5680fa18f 2023-08-23)

ubuntu#
Let's build "Hello World" to verify that static links are configured correctly.
ubuntu# cargo build --release --target=x86_64-unknown-linux-musl
   Compiling hello v0.1.0 (/root/hello)
    Finished release [optimized] target(s) in 0.37s

ubuntu# ldd target/x86_64-unknown-linux-musl/release/hello
statically linked
You can see that "Hello World" is configured as a static link using the musl environment.
Now let's run "Hello World" built with both dynamic and static links by copying the binaries on CentOS and Alpine environments. CentOS 8 uses glibc dynamic linking and Alpine Linux uses musl static linking.
CentOS Container Environment
$ docker run -it --name centos centos:centos8 bash
centos#
Alpine Container Environment
The Alpine distribution uses musl by default rather than glic.
$ docker run -it --rm alpine:3.18
alpine#
Let's copy 'Hello World' into a glibc environment and a musl environment to see the behavior.
$ docker cp ubuntu:/root/hello/target/x86_64-unknown-linux-musl/release/hello .
$ docker cp hello centos:/root/
$ docker cp hello alpine:/root/
Let's check the behavior on centOS.
centos# ./hello
Hello, world!
Let's check the behavior on alpine.
alpine# ./hello
Hello, world!
Comparing glibc and musl using the Rust application 'slice'
Let's take the Rust application 'slice' and compare the container images created with glibc and musl.
The Rust implementation of 'slice', like Python's 'slice', is publicly available on the GitHub repository https://github.com/ChanTsune/slice. 'slice' is a tool that prints the contents of a file from the front or back, like 'head' or 'tail'. For example, the command below will print lines 10 through 20 from 'file.txt'.
$ slice 10:20 file.txtWhen you build 'slice' in a Rust environment and create a container to use it, you can use it like this
$ docker run -i --rm -v `pwd`:`pwd` -w `pwd` sliceLet's build a container using glibc in the Ubuntu 22.04 environment.
FROM rust:latest as builder

WORKDIR /work
RUN git clone https://github.com/ChanTsune/slice /work/.
RUN cargo build --release
RUN strip /work/target/release/slice -o /slice

FROM ubuntu:22.04
COPY --from=builder /slice /usr/local/bin/

ENTRYPOINT ["slice"]
This time, we'll create a container image based on Ubuntu 22.04 using musl static links.
FROM rust:latest as builder

RUN rustup target add "$(uname -m)"-unknown-linux-musl
WORKDIR /work
RUN git clone https://github.com/ChanTsune/slice /work/.
RUN cargo build --release --target "$(uname -m)"-unknown-linux-musl
RUN strip /work/target/"$(uname -m)"-unknown-linux-musl/release/slice -o /slice

FROM ubuntu:22.04
COPY --from=builder /slice /usr/local/bin/

ENTRYPOINT ["slice"]
Let's create a container image based on theAlpine distribution using a musl static link.
FROM rust:latest as builder

RUN rustup target add "$(uname -m)"-unknown-linux-musl
WORKDIR /work
RUN git clone https://github.com/ChanTsune/slice /work/.
RUN cargo build --release --target "$(uname -m)"-unknown-linux-musl
RUN strip /work/target/"$(uname -m)"-unknown-linux-musl/release/slice -o /slice

FROM alpine
COPY --from=builder /slice /

ENTRYPOINT ["slice"]
If we compare the size of a glibc container image and a musl container image on Ubuntu 22.04 and a musl container image on Alpine, we can see that the container image with musl is smaller.
$ docker images
REPOSITORY TAG               IMAGE ID       CREATED              SIZE
slice      distroless-musl   d38a74f8568a   11 seconds ago        3.52MB
slice      alpine-musl       e3abb5f0aace   39 seconds ago        8.4MB
slice      ubuntu22.04-musl  467edd130e79   About a minute ago   78.9MB
slice      ubuntu22.04-glibc 09fe5ad40d56   3 minutes ago        78.8MB
In the Ubuntu environment, using glibc or musl doesn't make much difference in the size of the container image, but in the Alpine distribution, you can see that the container image size is reduced by about a tenth. This shows that by utilizing Alpine Linux with static builds, we can make our container images lightweight and reduce deployment time.
Conclusion
Using static links in programs that use standard C libraries can simplify the process of deploying Linux binaries. It also reduces the size of the container image compared to dynamic links, and makes deployment convenient regardless of the distribution. When you replace glibc with musl, you benefit not only from the difference in container image size, but also from features newly supported by musl, such as mDNS (a multicast-DNS-based zero config system) and NUMA clusters. Furthermore, if you use distroless, which is distributed by Google to better utilize musl, as your default container image, you can deploy and take advantage of smaller container images.
This post is automatically translated from Korean
20 September 2023

Digging bitsandbytes issue
By Jeongseok KangBackend.AI is a popular choice for developing these LLMs because of its ease of use in running large clusters and distributed processing. In fact, we get a lot of feedback and requests from customers, and today I'd like to share how we solved one of them.
On April 4, 2023, we received a report of an issue where an error occurs when running certain packages in the container environment provided by the NGC Catalog[^1] (NVIDIA GPU Cloud). The NGC Catalog is a list of containers[^2] with optimized environments for developing AI/ML, metaverse, and high-performance computing applications, and because it is operated and distributed directly by NVIDIA, it is highly trusted and considered the standard for CUDA environments in particular. Therefore, an issue with this environment represents a potential risk that many users will face in the future, and we have decided to address this issue as a high priority.
Reproducing the problem
I first went through the process of reproducing the issue to determine the exact cause. In this case, I was running ViperGPT[^3] developed by Columbia University and encountered an error in a package called
bitsandbytes. ViperGPT has a dependency onbitsandbytesas shown below.accelerate==0.18.0 backoff==2.2.1 // highlight-next-line bitsandbytes==0.38.1 cityscapesscripts==2.2.1 git+https://github.com/openai/CLIP.git decord==0.6.0 dill==0.3.6 ...I was able to reproduce the problem by simply
importingbitsandbytes.The execution environment used the nvcr.io/nvidia/pytorch:22.05-py3 image.
$ pip install bitsandbytes  # 0.37.1
$ python
>> import bitsandbytes
===================================BUG REPORT===================================
Welcome to bitsandbytes. For bug reports, please submit your error trace to: https://github.com/TimDettmers/bitsandbytes/issues
================================================================================
CUDA exception! Error code: OS call failed or operation not supported on this OS
CUDA exception! Error code: initialization error
CUDA SETUP: CUDA runtime path found: /home/work/data/miniconda3/envs/vipergpt/lib/libcudart.so
/home/work/data/miniconda3/envs/vipergpt/lib/python3.10/site-packages/bitsandbytes/cuda_setup/main.py:136: UserWarning: WARNING: No GPU detected! Check your CUDA paths. Proceeding to load CPU-only library...
  warn(msg)
CUDA SETUP: Detected CUDA version 116
CUDA SETUP: Loading binary /home/work/data/miniconda3/envs/vipergpt/lib/python3.10/site-packages/bitsandbytes/libbitsandbytes_cpu.so...
/home/work/data/miniconda3/envs/vipergpt/lib/python3.10/site-packages/bitsandbytes/cextension.py:31: UserWarning: The installed version of bitsandbytes was compiled without GPU support. 8-bit optimizers and GPU quantization are unavailable.
  warn("The installed version of bitsandbytes was compiled without GPU support. "
The
bitsandbytestraverses all the CUDA devices installed in the execution environment and checks their Compute Capability [^4]. We were supposed to check the number of CUDA devices installed in the execution environment usinglibcuda.soin the following way. We noticed that an error occurs when we callcuDeviceGetCount()[^5]. The error was 304 CUDA_ERROR_OPERATING_SYSTEM.def get_compute_capabilities(cuda): """ 1. find libcuda.so library (GPU driver) (/usr/lib) init_device -> init variables -> call function by reference 2. call extern C function to determine CC (https://docs.nvidia.com/cuda/cuda-driver-api/group__CUDA__DEVICE__DEPRECATED.html) 3. Check for CUDA errors https://stackoverflow.com/questions/14038589/what-is-the-canonical-way-to-check-for-errors-using-the-cuda-runtime-api # bits taken from https://gist.github.com/f0k/63a664160d016a491b2cbea15913d549 """ nGpus = ct.c_int() cc_major = ct.c_int() cc_minor = ct.c_int() device = ct.c_int() # highlight-next-line check_cuda_result(cuda, cuda.cuDeviceGetCount(ct.byref(nGpus))) ccs = [] for i in range(nGpus.value): check_cuda_result(cuda, cuda.cuDeviceGet(ct.byref(device), i)) ref_major = ct.byref(cc_major) ref_minor = ct.byref(cc_minor) # 2. call extern C function to determine CC check_cuda_result(cuda, cuda.cuDeviceComputeCapability(ref_major, ref_minor, device)) ccs.append(f"{cc_major.value}.{cc_minor.value}") return ccsWhat is bitsandbytes?
Since the advent of Transformer, language models have shown high performance gains, and it has become a trend to increase the size of the model by stacking more Transformer blocks. This has led to a large number of GPU resources being required not only to train the model but also to service it. For example, to service GPT-3 with 175B parameters, eight 80GB A100 GPUs costing about $15,000 are required. This is a huge burden not only for individuals, but also for enterprises or research institutes, which is why there is a lot of research on lightweighting inference models for servicing.
bitsandbytes has open-sourced LLM.int8()[^6], a work by Tim Dettmers, a PhD candidate at the University of Washington, with Facebook AI Research (now Meta AI). It has shown to reduce the size of the model while maintaining performance by applying a vector-wise quantization method that treats each vector independently when computing matrix products, and by using a mix of 8-bit and 16-bit techniques to minimize losses by representing important vectors in 16-bit. It has been merged into Hugging Face's Transformer implementation and is used in a variety of models including [Llama2] (https://github.com/facebookresearch/llama-recipes/blob/cd82118b74d2fd739bd6227af33b661d04a97406/requirements.txt#L6), [QLoRA] (https://github.com/artidoro/qlora/blob/6c6fc4653abd17ce550f48878a24c7bd8772e98a/requirements.txt#L1), [KoAlpaca] (https://github.com/Beomi/KoAlpaca/blob/4596f882957d286b4d60559b97dcf783822d23f5/webui/requirements.txt#L5), and [KULLM] (https://github.com/nlpai-lab/KULLM/blob/b7a78b62ed6cd9d83c51ad5a92a9dd40b9f35998/requirements.txt#L4).
Identify the cause
Now that we've located and reproduced the problem, it's time to get to the bottom of it. I looked to see if there were any similar cases, but I couldn't find any. Also,
cuInit()was called normally, making it even more difficult to pinpoint the cause.import ctypes count = ctypes.c_int() libcuda = ctypes.CDLL("libcuda.so") libcuda.cuInit(0) # 0 (CUDA_SUCCESS) libcuda.cuDeviceGetCount(ctypes.byref(count)) # 304 (CUDA_ERROR_OPERATING_SYSTEM) libcudart = ctypes.CDLL("libcudart.so") libcudart.cudaGetDeviceCount(ctypes.byref(count)) # 304 (CUDA_ERROR_OPERATING_SYSTEM)I filed an issue on the GitHub repo (TimDettmers/bitsandbytes#264) for advice, and was told to update the package to the latest version and try again. After updating to version 0.38.0.post1, which was the latest at the time, I tested again, and the same problem occurred. I couldn't afford to lose too much time, so I decided to switch gears and remove the offending part.
Image source: Greco-Roman Mythology in Comics (Ghana Publishers)Troubleshooting
My first approach was to use CUDA-Python[^7]. CUDA-Python is the CUDA Python Low-Level Bindings package officially distributed by NVIDIA. I had used it before and found it useful, so I immediately thought of it and decided to install and test it.
$ pip install cuda-pythonfrom cuda import cuda from cuda import cudart cuda.cuInit(0) # (<CUresult.CUDA_SUCCESS: 0>,) cudart.cudaGetDeviceCount() # (<cudaError_t.cudaSuccess: 0>, 1)Fortunately,
cudart.cudaGetDeviceCount()worked fine, and I proceeded to test integrating it intobitsandbytes. However, callingtorch.cuda.is_available()after callingcuda.cuInit(0)resulted in an error. This was because I calledcudaGetDeviceCount()insidetorch.cuda.is_available().from cuda import cuda, cudart cuda.cuInit(0) # <CUresult.CUDA_SUCCESS: 0>,) cuda.cudaGetDeviceCount() # (<cudaError_t.cudaSuccess: 0>, 1) import bitsandbytes # ... # /opt/conda/lib/python3.8/site-packages/torch/cuda/__init__.py:82: UserWarning: CUDA initialization: Unexpected error from cudaGetDeviceCount(). Did you run some cuda functions before calling NumCudaDevices() that might have already set an error? Error 304: OS call failed or operation not supported on this OS (Triggered internally at /opt/pytorch/pytorch/c10/cuda/CUDAFunctions.cpp:109.) # return torch._C._cuda_getDeviceCount() > 0 # ...The problem seemed to be back to square one. I took a breath and calmly reread the error log above. Then something caught my eye.
torch._C._cuda_getDeviceCount() > 0
Note that
bitsandbyteswas already using PyTorch internally, which means it had a dependency on PyTorch. To be precise, `bitsandbytes' had a dependency on lion-pytorch, which had a dependency on PyTorch. And PyTorch already had an interface to CUDA functions, which I decided to take advantage of this time.Fortunately, all of the CUDA functions used by
bitsandbytesexisted in PyTorch. I made the following changes to the functions that were previously called vialibcuda.soandlibcudart.so.libcuda/libcudart torch libcuda.cuDeviceGetCount() torch.cuda.device_count() libcuda.cuDeviceGet() torch.cuda.device() libcuda.cuDeviceComputeCapability() torch.cuda.get_device_capability() libcudart.cudaRuntimeGetVersion() torch.version.cuda After verifying that it worked after the change, I registered a PR in the GitHub repository (TimDettmers/bitsandbytes#375) to apply to the distribution package version.
Postscript
On July 14, 2023, about two months after registering the PR, the patch was merged into the main branch and included in version 0.40.1.
 I was also able to get some feedback from the author, Tim Dettmers, whose thoughts and philosophy are evident in this short article.
 Through this opportunity, I was able to learn more about LLM's ecosystem. It was also the first time in a long time that I was able to feel the fun of open source activities. I think the appeal of open source activities is that we can collaborate beyond spatial constraints and learn from each other's ideas. We run an open source version of Backend.AI alongside an enterprise version. We will always strive to provide a better user experience and a better developer experience.
[^1]: NVIDIA GPU Cloud [^2]: The NGC catalog hosts containers for AI/ML, metaverse, and HPC applications and are performance-optimized, tested, and ready to deploy on GPU-powered on-prem, cloud, and edge systems. [^3]: ViperGPT: Visual Inference via Python Execution for Reasoning, March 14, 2023. [^4]: https://docs.nvidia.com/cuda/cuda-c-programming-guide/index.html#compute-capability [^5]: https://docs.nvidia.com/cuda/cuda-driver-api/group__CUDA__DEVICE.html#group__CUDA__DEVICE_1g52b5ce05cb8c5fb6831b2c0ff2887c74 [^6]: LLM.int8(): 8-bit Matrix Multiplication for Transformers at Scale, November 10, 2022. [^7]: https://developer.nvidia.com/cuda-python
This post is automatically translated from Korean
28 July 2023

Sneak Peek: Backend.AI Model Service Preview
By Kyujin ChoIntroduction
As super-sized AI models flood the market, there is a growing concern about not only developing the models, but also how to deliver them "well" and "efficiently" to users. Prior to Large Language Models (LLMs), the computing power of AI models was focused on training rather than inference, as the hardware requirements for attempting to make inferences with a trained model were much smaller than the computing power needed to train the model. Deployers of models could get enough power for inference from the NPU of a real user's end device (such as a smartphone). However, with the advent of LLMs, the tables were turned.
Take Meta's [OPT 175b] (https://github.com/facebookresearch/metaseq) as an example: OPT-175b, as its name implies, has 175 billion parameters and requires roughly 320+ GB of GPU memory just to load them onto the GPU to perform inference tasks. That's a huge difference from the 4GB that pre-LLM image processing models used to require.
With this change in AI model behavior, efficiently managing service resources has become paramount to keeping your service running reliably. In this article, we'll preview Backend.AI's upcoming model service feature, Backend.AI Model Service, and show you how it will allow you to efficiently run your AI model from training to serving with a single infrastructure.Backend.AI Model Service

Backend.AI Model Service is a model serving system that runs on top of the existing Backend.AI solution. It takes Backend.AI's tried-and-true container management technology and container app delivery system, AppProxy[^1], to the next level, enabling both AI training and model service in one infrastructure without installing additional components and by simply upgrading the existing Backend.AI infrastructure. It also supports an auto-scaling feature that automatically scales up and down inference sessions based on per-session GPU usage, number of API calls, or time of day, allowing you to effectively manage AI resources used for inference.
Inference Sessions

Inference sessions in Backend.AI are conceptually the same as traditional training sessions. You can use the same execution environment you've been using for training for inference sessions, or you can deploy a dedicated execution environment just for inference sessions. Inference sessions are volatile and stateless, so you can terminate them at any time if the session is not performing well. In this case, Backend.AI will attempt to recover the original state by creating a new inference session, while simultaneously forwarding inference requests to other living inference sessions to minimize downtime for the inference service.
Model storage
Models to be served through Backend.AI are managed as "model storage" units. Model storage consists of model files, code for model services, and model definition files.
Model definition file
The model definition file is where you define the information for running a service provider's model in the Backend.AI Model Service. The model definition file contains information about the model, the ports exposed by the model service, and a set of tasks that must be executed to run the model service. If your model service provides a health check feature that reports its own health, you can use that information to take action, such as excluding sessions from the service if they are in bad health.
models:
  - name: "KoAlpaca-5.8B-model"
    model_path: "/models/KoAlpaca-5.8B"
    service:
      pre_start_actions:
        - action: run_command
          args:
            command: ["pip3", "install", "-r", "/models/requirements.txt"]
      start_command:
        - uvicorn
        - --app-dir
        - /models
        - chatbot-api:app
        - --port
        - "8000"
        - --host
        - "0.0.0.0"
      port: 8000
      health_check:
        path: /health
        max_retries: 10
Here is an example of a well-defined model definition file, which contains a set of steps to run the KoAlpaca 5.8B model as a model service.
Tutorial: Model Service with Backend.AI Model Service
In this tutorial, we'll actually use Backend.AI to service a KoAlpaca 5.8B model quantized to 8 bits.
Write the API server code
Write a simple API server to serve the model.
import os
from typing import Any, List

from fastapi import FastAPI, Response
from fastapi.responses import RedirectResponse, StreamingResponse, JSONResponse
from fastapi.staticfiles import StaticFiles
import numpy as np
from pydantic import BaseModel
import torch
from transformers import pipeline, AutoModelForCausalLM
import uvicorn

URL = "localhost:8000"
KOALPACA_MODEL = os.environ["BACKEND_MODEL_PATH"]

torch.set_printoptions(precision=6)

app = FastAPI()

model = AutoModelForCausalLM.from_pretrained(
    KOALPACA_MODEL,
    device_map="auto",
    load_in_8bit=True,
)


pipe = pipeline(
    "text-generation",
    model=model,
    tokenizer=KOALPACA_MODEL,
)


class Message(BaseModel):
    role: str
    content: str


class ChatRequest(BaseModel):
    messages: List[Message]


BASE_CONTEXTS = [
    Message(role="맥락", content="KoAlpaca(코알파카)는 EleutherAI에서 개발한 Polyglot-ko 라는 한국어 모델을 기반으로, 자연어 처리 연구자 Beomi가 개발한 모델입니다."),
    Message(role="맥락", content="ChatKoAlpaca(챗코알파카)는 KoAlpaca를 채팅형으로 만든 것입니다."),
    Message(role="명령어", content="친절한 AI 챗봇인 ChatKoAlpaca 로서 답변을 합니다."),
    Message(role="명령어", content="인사에는 짧고 간단한 친절한 인사로 답하고, 아래 대화에 간단하고 짧게 답해주세요."),
]


def preprocess_messages(messages: List[Message]) -> List[Message]:
    ...


def flatten_messages(messages: List[Message]) -> str:
    ...


def postprocess(answer: List[Any]) -> str:
    ...


@app.post("/api/chat")
async def chat(req: ChatRequest) -> StreamingResponse:
    messages = preprocess_messages(req.messages)
    conversation_history = flatten_messages(messages)
    ans = pipe(
        conversation_history,
        do_sample=True,
        max_new_tokens=512,
        temperature=0.7,
        top_p=0.9,
        return_full_text=False,
        eos_token_id=2,
    )
    msg = postprocess(ans)

    async def iterator():
        yield msg.strip().encode("utf-8")

    return StreamingResponse(iterator())


@app.get("/health")
async def health() -> Response:
    return JSONResponse(content={"healthy": True})


@app.exception_handler(404)
async def custom_404_handler(_, __):
    return RedirectResponse("/404.html")


app.mount(
    "/",
    StaticFiles(directory=os.path.join(KOALPACA_MODEL, "..", "chatbot-ui"), html=True),
    name="html",
)
Create a model definition file
Create a model definition file for your API server.
models:
  - name: "KoAlpaca-5.8B-model"
    model_path: "/models/KoAlpaca-Ployglot-5.8B"
    service:
      pre_start_actions:
        - action: run_command
          args:
            command: ["pip3", "install", "-r", "/models/requirements.txt"]
      start_command:
        - uvicorn
        - --app-dir
        - /models
        - chatbot-api:app
        - --port
        - "8000"
        - --host
        - "0.0.0.0"
      port: 8000
      health_check:
        path: /health
        max_retries: 10
In a session of the model service, model storage is always mounted under the
/modelspath.Prepare model storage

Add the model API server code you wrote, the model definition file, and the KoAlpaca model to your model storage.
Create a model service

With both the model file and the model definition file ready, you can now start the Backend.AI Model Service. The Model Service can be created using the
backend.ai service createcommand in the Backend.AI CLI. The arguments accepted byservice createare almost identical to thebackend.ai session createcommand. After the image to use, you pass the ID of the model storage and the number of inference sessions to initially create.
Using
backend.ai service info, you can check the status of the model service and the inference sessions belonging to the service. You can see that one inference session has been successfully created.Use the Reasoning API

You can use the
backend.ai service get-endpointcommand to see the inference endpoint of a created model service. The inference endpoint continues to have a unique value until a model service is created and removed. If a model service belongs to multiple inference sessions, AppProxy will distribute requests across the multiple inference sessions.Restricting access to the Reasoning API

If you want to restrict who can access the inference API, you can enable authentication for the inference API by starting the model service with the
--publicoption removed. Authentication tokens can be issued with thebackend.ai service generate-tokencommand.Scaling inference sessions

The
backend.ai service scalecommand allows you to change the scale of inference sessions belonging to the model service.Closing thoughts
So far, we've learned about Backend.AI Model Service and how to actually deploy a model service with the Model Service feature. Backend.AI Model Service is targeted for general availability in Backend.AI 23.03. We're working hard to make the Model Service feature publicly available in the near future, so stay tuned.
---]
[^1]: Available from Backend.AI Enterprise.
This post is automatically translated from Korean
30 May 2023
 Image source:


